Your First AI Experiment: Run It Locally, Hassle-Free – Part 2 – Workflow Implementation
")
Don’t Worry About the Code
If you’re thinking, “I’m a SQL Developer or a DBA — how will I ever understand Python or Streamlit configurations?” — don’t worry. The code is intentionally kept very simple with line-by-line comments to guide you. Once you walk through it, you’ll realize how easy it actually is. You don’t need to memorize anything; just sit with it, focus for a little while, and everything will make sense.
Step 1: Install Python (if not installed)
- Go to: https://www.python.org/downloads/windows/
- Click Download Python 3.x.x (latest version).
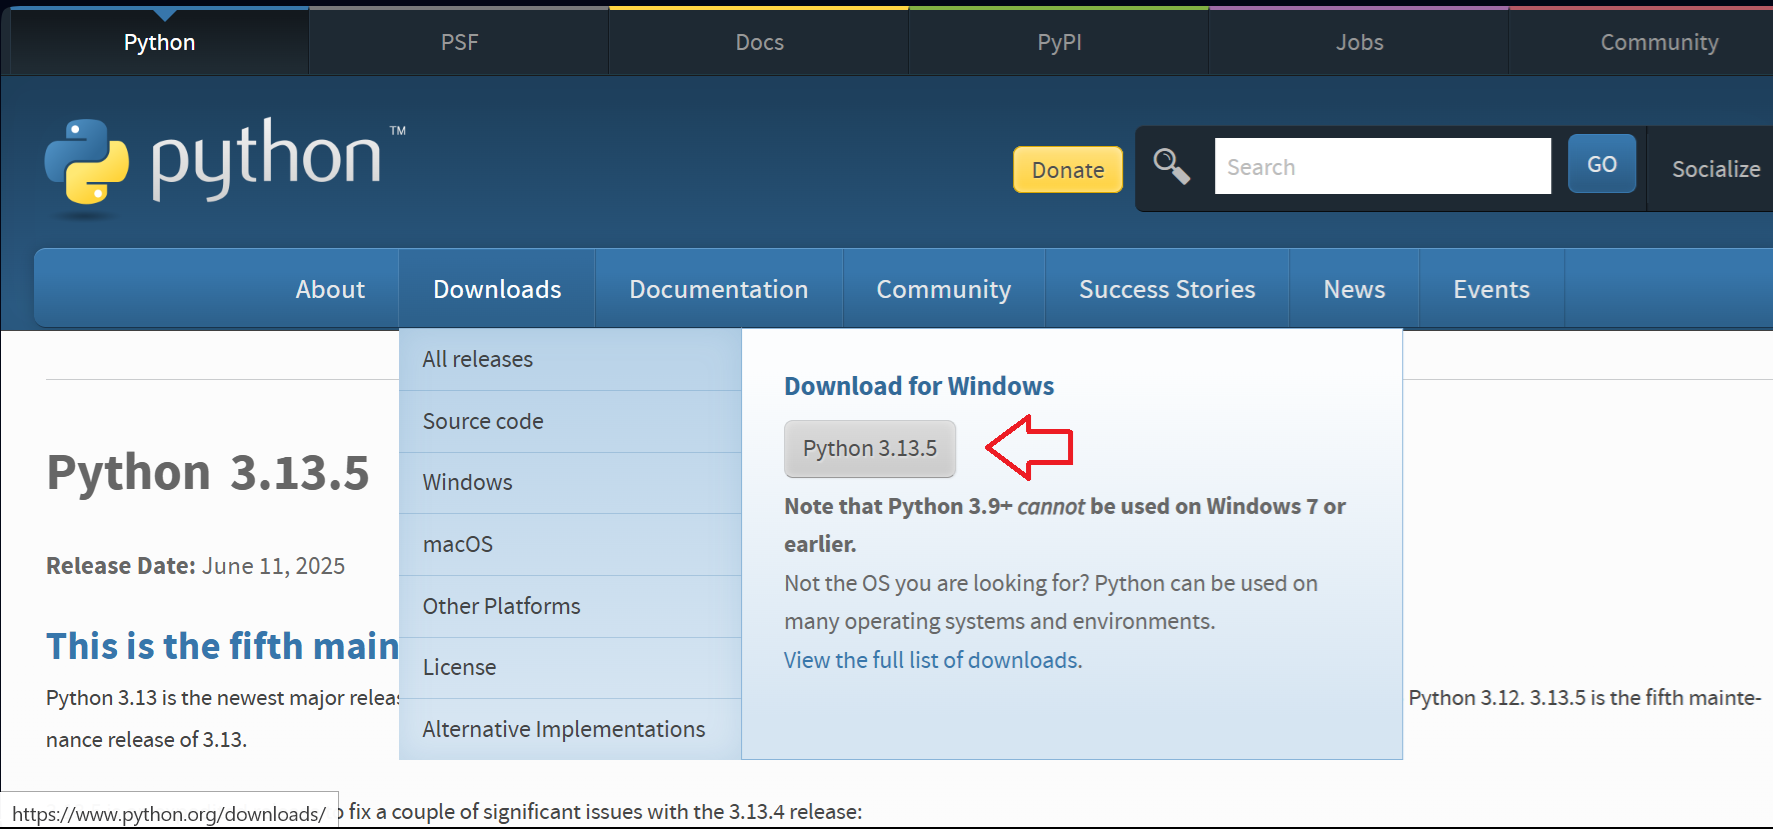
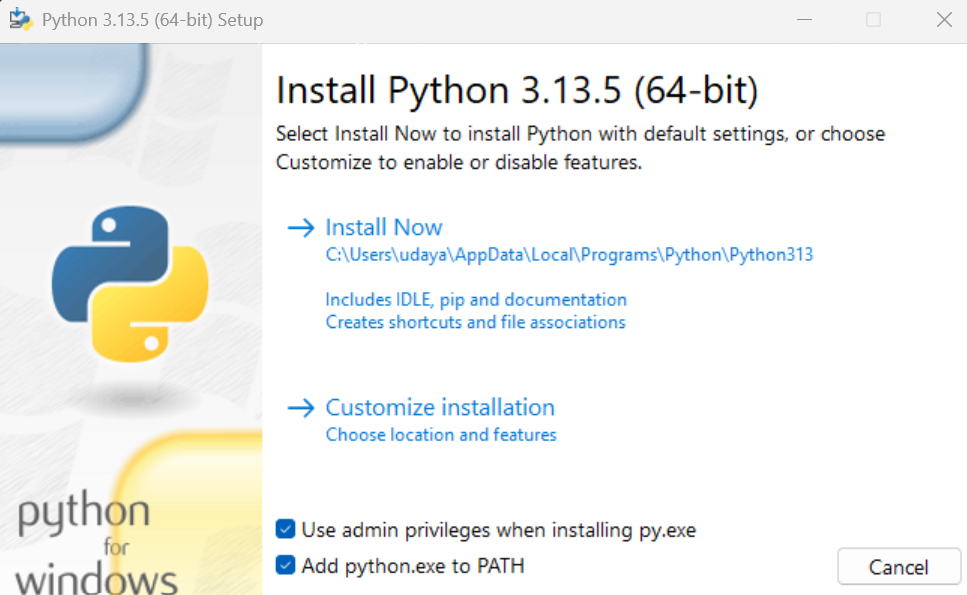
- Run the installer:
- ✅ Check the box: “Add Python to PATH”
- ✅ Choose “Install Now”
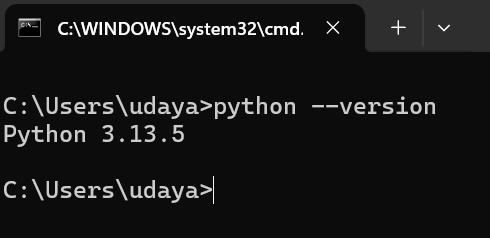
- After installation, open Command Prompt and run:
python –version
It should show something like: Python 3.12.1
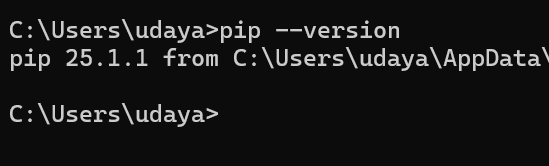
🔹 Step 2: Install Pip (Python’s package installer)
Usually installed with Python automatically. To confirm:
pip –version
If it shows a version, you’re good. If not, reinstall Python and make sure “Add to PATH” is checked.
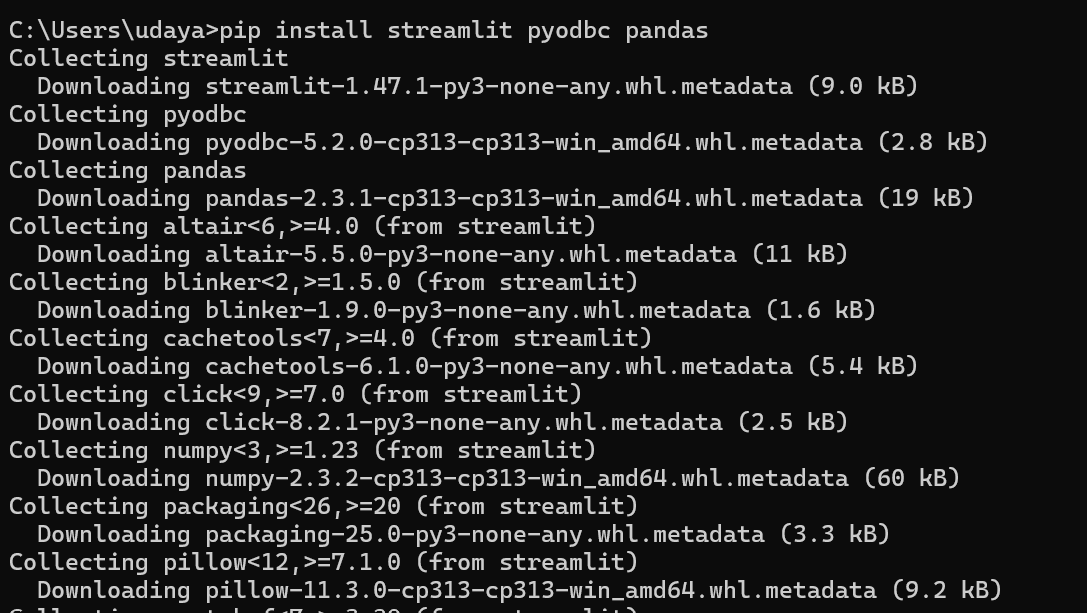
🔹 Step 3: Install Streamlit and Required Packages
Open Command Prompt and run:
pip install streamlit pyodbc pandas
✅ This installs:
- streamlit for building the web UI
- pyodbc to connect to a database server (SQL Server)
- pandas to display tables nicely
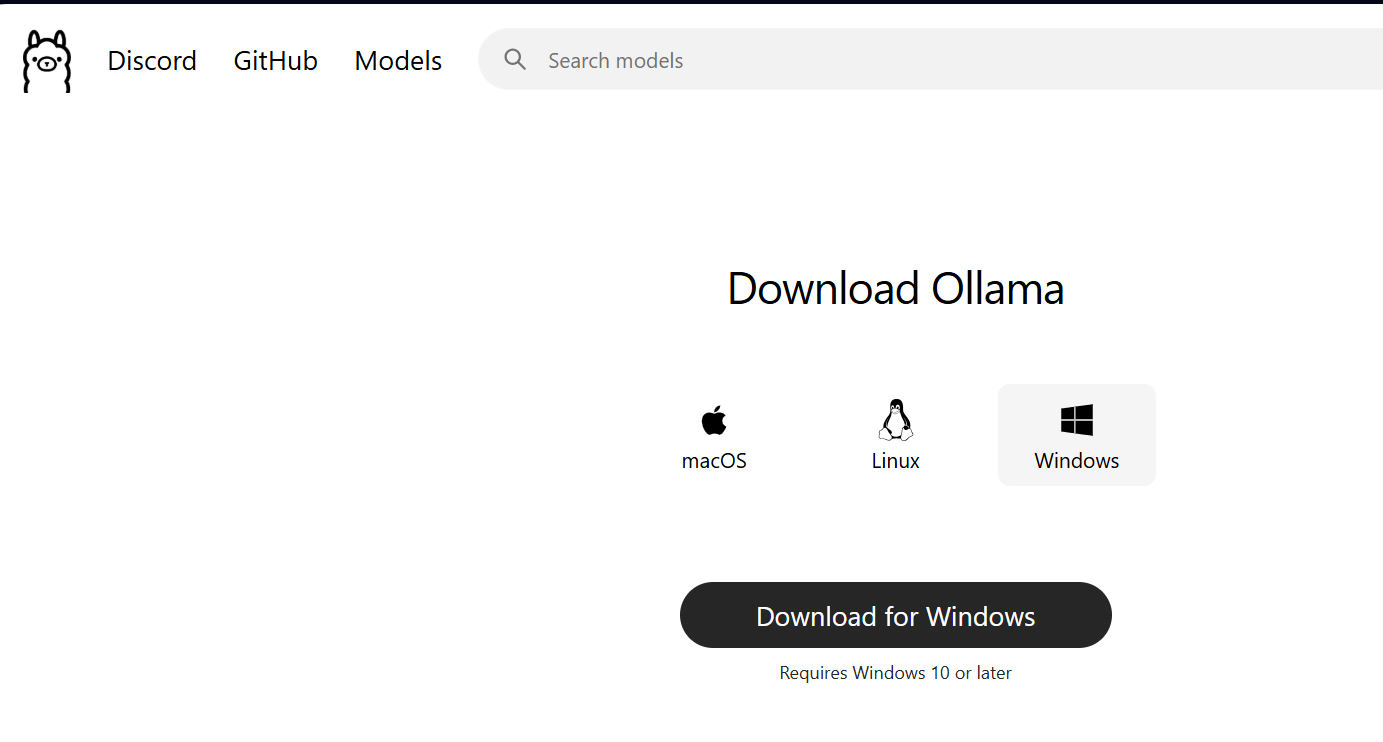
🔹 Step 4: Install Ollama and Pull LLM
- Go to: https://ollama.ai/download
- Download the Windows version and install.
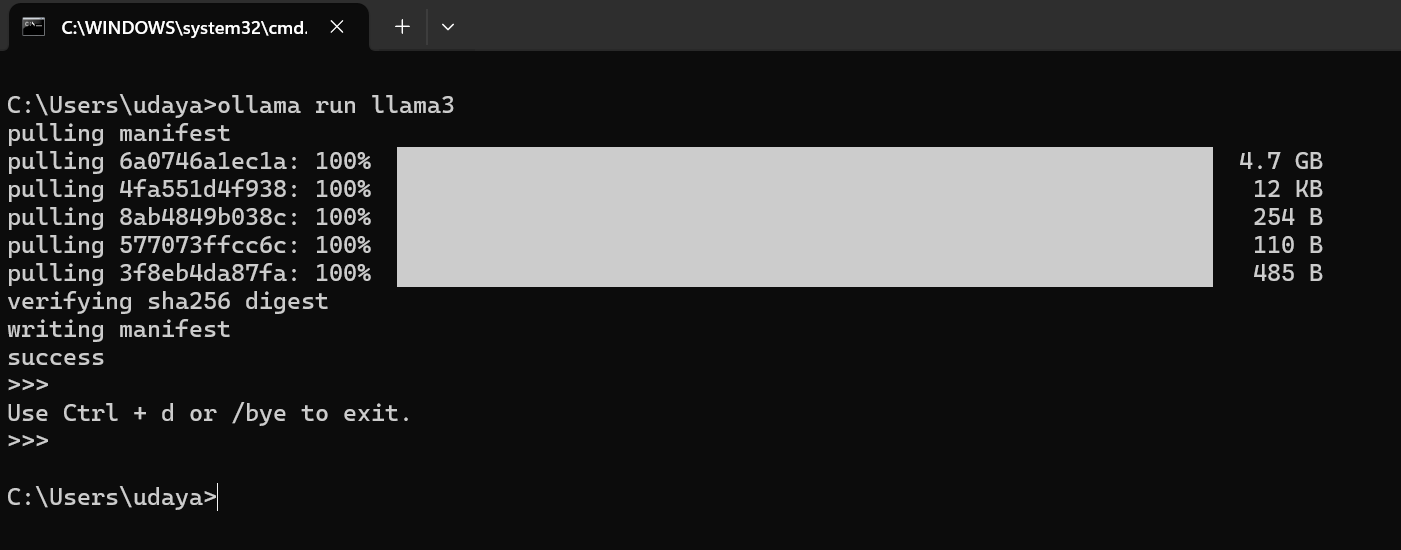
- After installation, open Command Prompt and run:
ollama run llama3
It will download the model (llama3:8b). This may take a few minutes.
✅ After the download, it will show a chat prompt like: >>>, which means it’s working.
Exit using Ctrl + d.
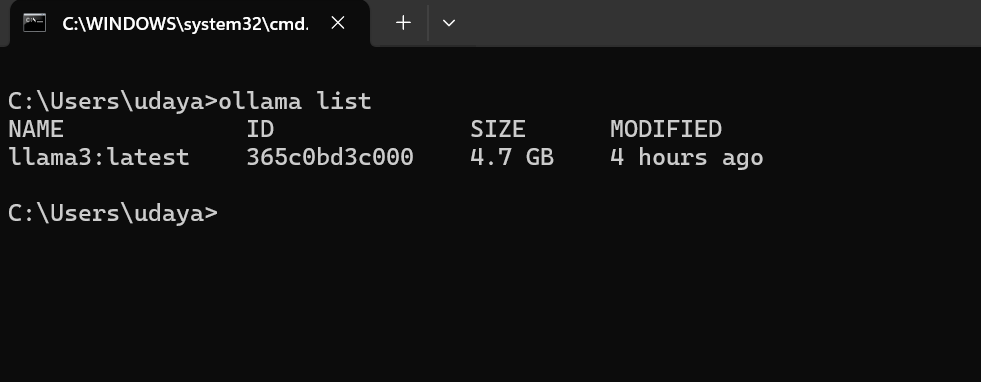
🔹 Step 4.1: Try Ollama in your PC
You have successfully installed an opensource LLM on your PC. Now lets try to ask some questions and see how it responds.
Check what are the LLMs installed in your local using list command
> ollma list
Now, lets try to interact with this model by asking some questions:


🔹 Step 5: Create a Demo SQL Server Database
Open SQL Server Management Studio (SSMS) or Azure Data Studio and run this script to create a test DB:
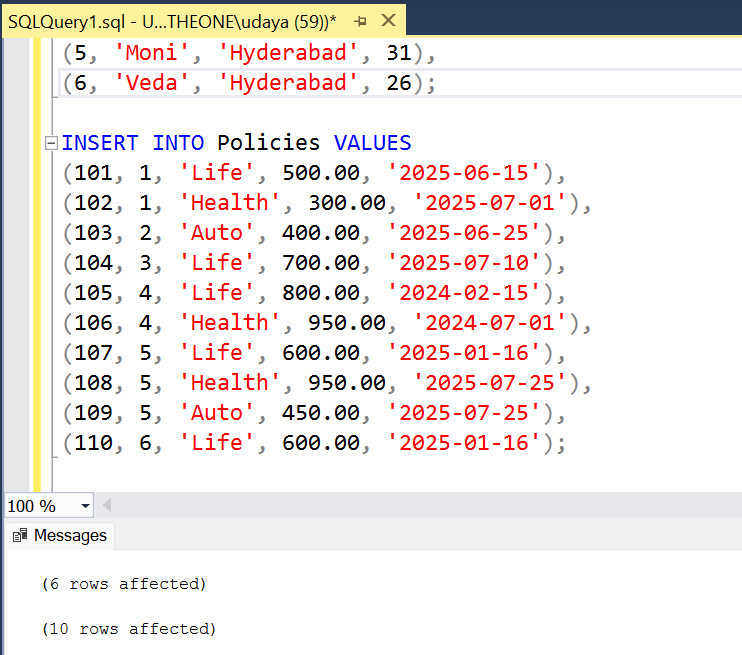
CREATE DATABASE InsuranceDemo;
GO
USE InsuranceDemo;

CREATE TABLE Customers (
    CustomerID INT PRIMARY KEY,
    Name NVARCHAR(50),
    City NVARCHAR(50),
    Age INT
);

CREATE TABLE Policies (
    PolicyID INT PRIMARY KEY,
    CustomerID INT,
    PolicyType NVARCHAR(50),
    PremiumAmount DECIMAL(10,2),
    PurchaseDate DATE,
    FOREIGN KEY (CustomerID) REFERENCES Customers(CustomerID)
);

-- Insert sample data
INSERT INTO Customers VALUES
(1, 'Alice', 'New York', 30),
(2, 'Bob', 'Chicago', 45),
(3, 'Charlie', 'New York', 28);

INSERT INTO Policies VALUES
(101, 1, 'Life', 500.00, '2025-06-15'),
(102, 1, 'Health', 300.00, '2025-07-01'),
(103, 2, 'Auto', 400.00, '2025-06-25'),
(104, 3, 'Life', 700.00, '2025-07-10');
✅ This creates two tables and adds a few records for testing.
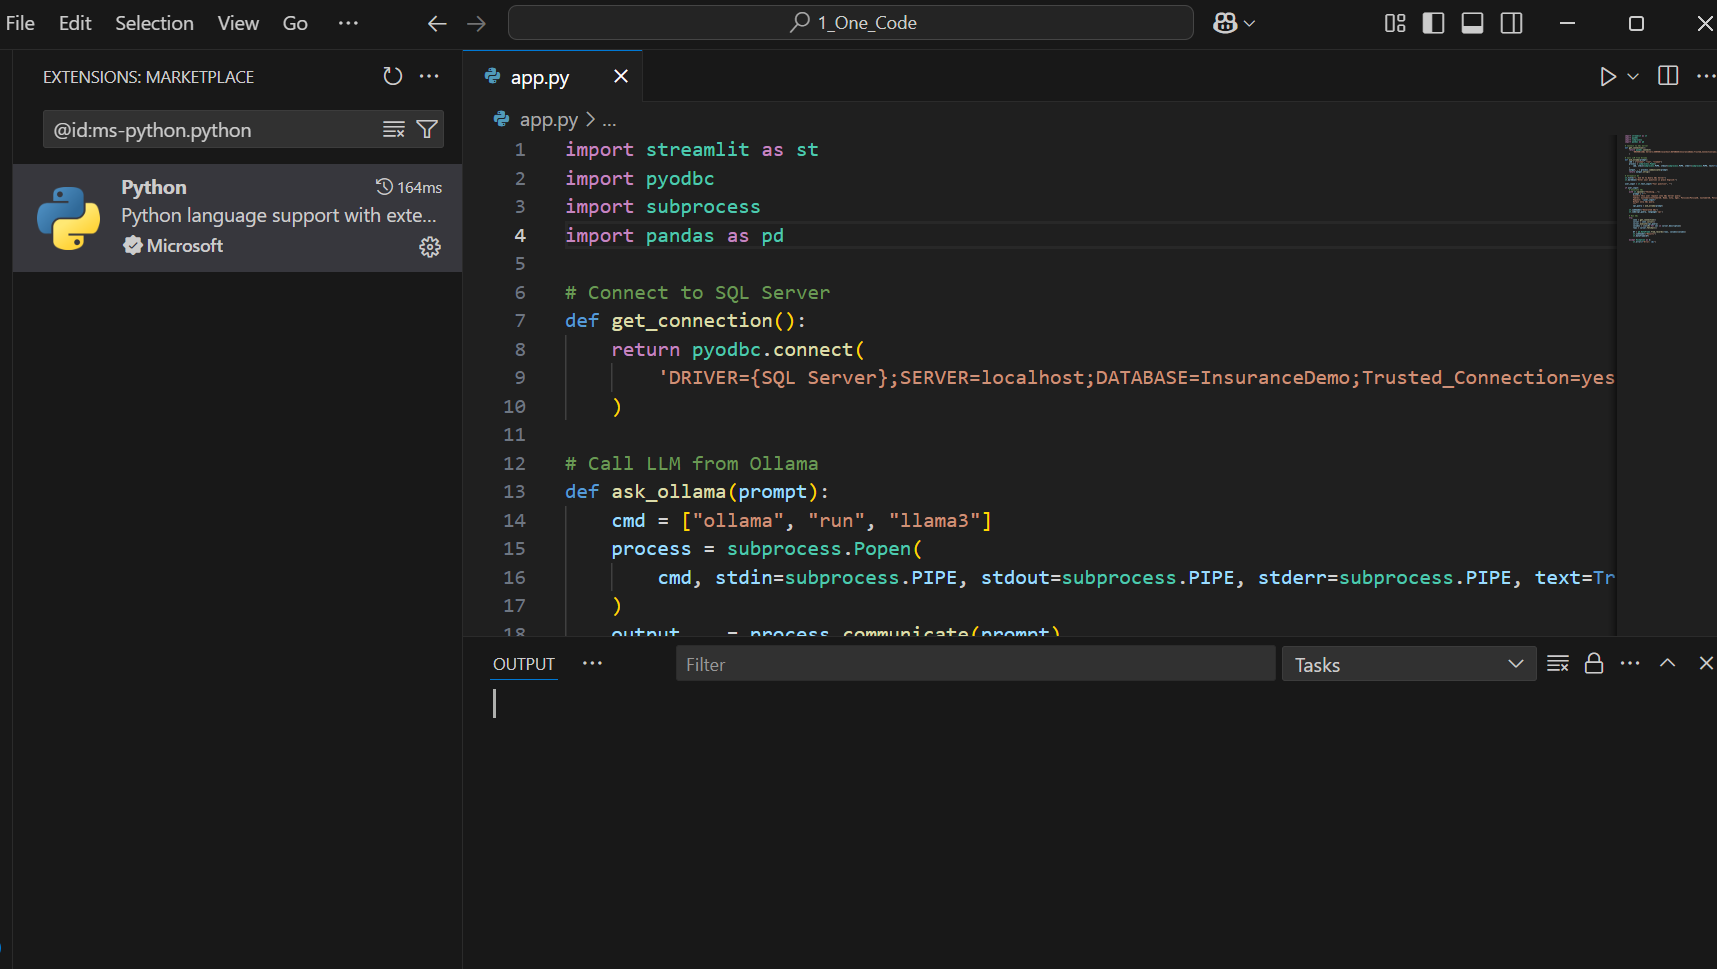
🔹 Step 6: Create the Streamlit App (app.py)
- Open Notepad or VS Code
- Paste this code and save as app.py in a folder of your choice.
# =====================================================================
# The One AI - Your First AI Agent (Auto SQL or General Answer)
# - Ask any question in plain English.
# - If it's about your data (SQL-ish intent), the app asks the local LLM
# to write SQL, runs it on SQL Server, and shows the results.
# - If it's a general knowledge question, the app asks the local LLM
# to answer directly (no database involved).
#
# Runs 100% locally with Ollama (no cloud APIs, no openai module needed).
# Author: Uday Arumilli
# Date: 04/Dec/2025
# =====================================================================
import streamlit as st
import pyodbc # Connect to SQL Server
import subprocess # Call Ollama CLI locally
import pandas as pd
import re # Extract clean SQL from LLM output
# -----------------------------
# PAGE APPEARANCE / HEADER
# -----------------------------
st.set_page_config(page_title="The One AI", page_icon="🧠", layout="centered")
# Simple CSS header block for a polished look
st.markdown("""
<style>
.title-container {
text-align: center;
padding: 20px;
background-color: #f0f2f6;
border-radius: 12px;
margin-bottom: 20px;
}
.main-title {
font-size: 36px;
font-weight: 800;
color: #31333f;
margin-bottom: 5px;
}
.sub-title {
font-size: 18px;
color: #5c5f66;
}
</style>
<div class="title-container">
<div class="main-title">🧠 The One AI - Your First AI Agent</div>
<div class="sub-title">Ask general questions or query SQL Server with plain English</div>
</div>
""", unsafe_allow_html=True)
# -----------------------------
# DATABASE CONNECTION
# -----------------------------
def get_connection():
"""
Returns a live connection to your local SQL Server database using Windows Authentication.
BEGINNER TIP:
- Make sure you created the InsuranceDemo DB and its tables in SSMS.
- If you use SQL Authentication (username/password), see the commented option below.
"""
# Windows Authentication (Trusted_Connection)
conn_str = 'DRIVER={SQL Server};SERVER=localhost;DATABASE=InsuranceDemo;Trusted_Connection=yes;'
# --- If you need SQL Authentication instead, use this style (uncomment & edit):
# conn_str = 'DRIVER={SQL Server};SERVER=localhost;DATABASE=InsuranceDemo;UID=your_user;PWD=your_password;'
return pyodbc.connect(conn_str)
# -----------------------------
# OLLAMA CALL (LOCAL LLM)
# -----------------------------
def ask_ollama(prompt: str, model: str = "llama3") -> str:
"""
Sends a prompt to your local LLM via Ollama CLI and returns its text output.
BEGINNER TIP:
- This DOES NOT use the internet or paid APIs.
- Ensure you've pulled a model once: `ollama pull llama3`
- You can change `model` to "mistral" or others you've pulled.
"""
cmd = ["ollama", "run", model]
# We open a subprocess, write the prompt to its stdin, and read the output from stdout.
process = subprocess.Popen(
cmd, stdin=subprocess.PIPE, stdout=subprocess.PIPE, stderr=subprocess.PIPE, text=True
)
output, _ = process.communicate(prompt)
return output.strip()
# -----------------------------
# SQL CLEANUP / EXTRACTION
# -----------------------------
def extract_sql(text: str) -> str | None:
"""
Cleans an LLM response and tries to extract the FIRST SQL statement.
Handles extra explanation like "Here is the SQL..." or code fences ```sql.
Returns the SQL string if found, else None.
BEGINNER TIP:
- LLMs sometimes add explanations or Markdown fences.
- We strip those and capture only the part that looks like SQL.
"""
# 1) Remove Markdown code fences like ``` or ```sql
lines = text.strip().splitlines()
clean_lines = [line for line in lines if not line.strip().startswith("```")]
cleaned = "\n".join(clean_lines).strip()
# 2) Remove "Here is the query"/explanations at the start of lines
noisy_prefixes = ("here is", "sql query", "the query", "this query", "explanation")
filtered = []
for line in cleaned.splitlines():
if any(line.strip().lower().startswith(p) for p in noisy_prefixes):
continue
filtered.append(line)
cleaned = "\n".join(filtered).strip()
# 3) Capture the first statement starting with SELECT/INSERT/UPDATE/DELETE up to the first semicolon
m = re.search(r"(SELECT|INSERT|UPDATE|DELETE)\b.*?;", cleaned, flags=re.IGNORECASE | re.DOTALL)
if m:
return m.group(0).strip()
# 4) Fallback: if no semicolon, but starts with SQL keyword, return the remainder
m2 = re.search(r"^(SELECT|INSERT|UPDATE|DELETE)\b.*", cleaned, flags=re.IGNORECASE | re.DOTALL)
if m2:
return m2.group(0).strip()
return None # No SQL found
# -----------------------------
# LIGHTWEIGHT INTENT DETECTION
# -----------------------------
def is_sql_intent(user_question: str) -> bool:
"""
Guess whether the question is about your demo database (SQL intent).
BEGINNER TIP:
- This is a simple keyword check. It's fast and works well enough for demos.
- For production, you could ask the LLM to classify, but this is fine to start with.
"""
domain_keywords = [
"customer", "customers", "policy", "policies", "premium", "purchase", "city",
"table", "tables", "sql", "database", "report", "count", "sum", "group by",
"list all", "show me", "get me", "top", "total", "per city", "per year"
]
uq = user_question.lower()
return any(k in uq for k in domain_keywords)
# -----------------------------
# UI: INPUTS
# -----------------------------
st.caption("Type any question. The agent will automatically choose whether to answer directly or query the database.")
# Using a form prevents running on every keystroke
with st.form("ask_form"):
user_input = st.text_input(
"Your question",
placeholder="e.g., What is the capital of India? OR Get total premium per city"
)
concise = st.checkbox("Prefer concise answers (for general questions)", value=True)
submitted = st.form_submit_button("Ask")
# -----------------------------
# MAIN LOGIC
# -----------------------------
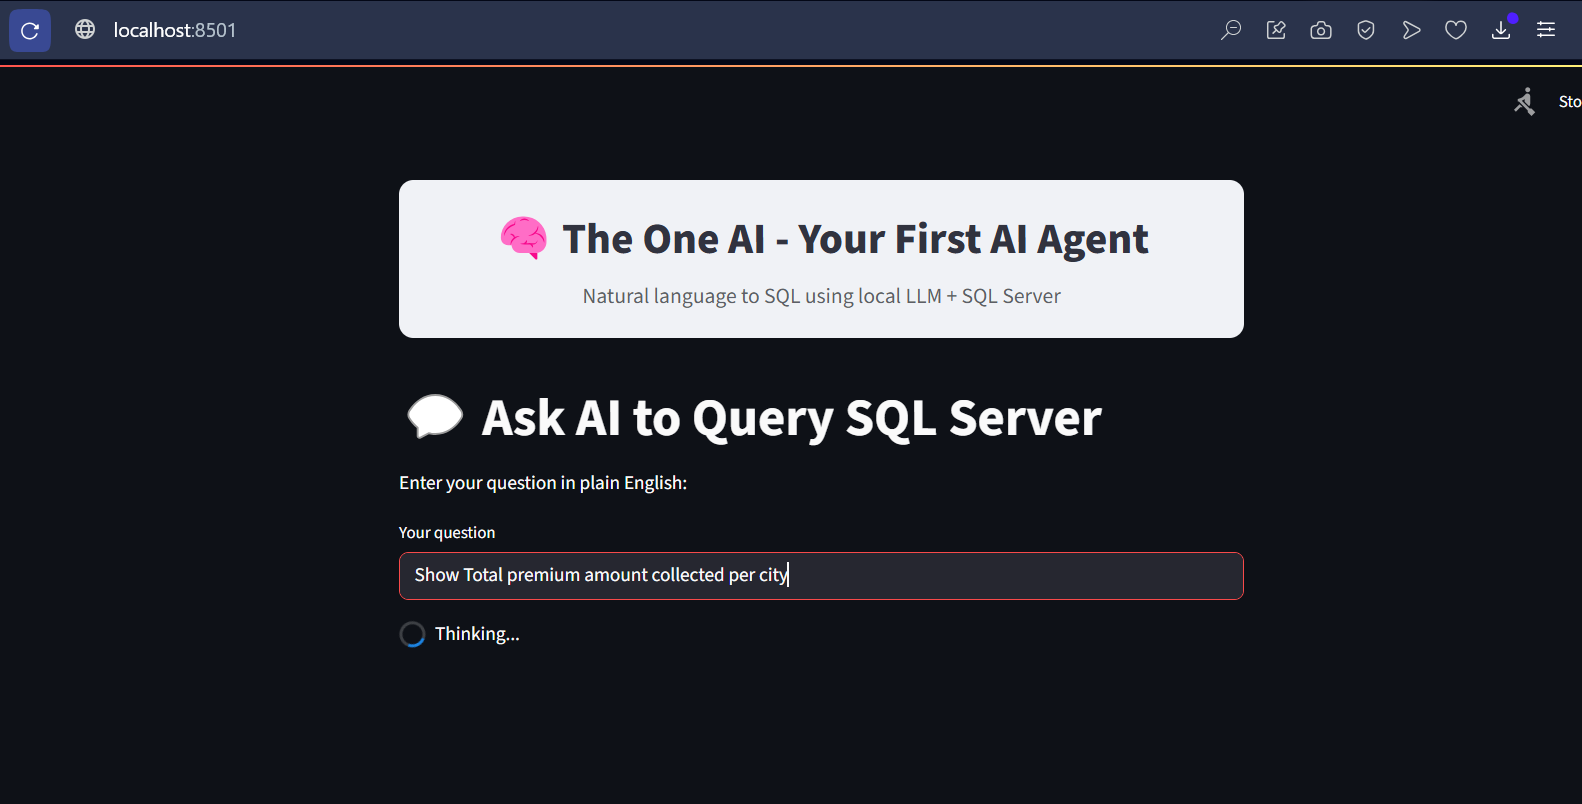
if submitted and user_input.strip():
with st.spinner("Thinking..."):
if is_sql_intent(user_input):
# -----------------------------
# SQL MODE: generate SQL + run it
# -----------------------------
st.markdown("**Mode:** SQL (database query)")
# Prompt tells the LLM your schema and asks for ONLY SQL output
sql_prompt = f"""
Convert the user's request into a valid SQL Server query.
Return only the SQL, no explanation.
Tables and columns:
- Customers(CustomerID, Name, City, Age)
- Policies(PolicyID, CustomerID, PolicyType, PremiumAmount, PurchaseDate)
User request: "{user_input}"
""".strip()
llm_raw = ask_ollama(sql_prompt) # raw LLM output (may include explanations)
sql_query = extract_sql(llm_raw) # attempt to get just the SQL
# Show raw output for learning/debugging
with st.expander("🔎 Raw LLM output (for debugging)"):
st.code(llm_raw)
if not sql_query:
st.warning("I couldn't detect a valid SQL query from the model's response. Please rephrase your request.")
else:
st.subheader("Generated SQL")
st.code(sql_query, language="sql")
# Execute the SQL safely
try:
conn = get_connection()
cursor = conn.cursor()
cursor.execute(sql_query)
# Fetch rows and column names
columns = [col[0] for col in cursor.description]
rows = cursor.fetchall()
df = pd.DataFrame.from_records(rows, columns=columns)
st.subheader("Results")
st.dataframe(df, use_container_width=True)
# Auto bar chart for simple 2+ column aggregated results
if len(df.columns) >= 2 and pd.api.types.is_numeric_dtype(df.iloc[:, 1]):
st.caption("Auto chart (if it makes sense):")
st.bar_chart(data=df.set_index(df.columns[0]))
except Exception as e:
st.error(f"Error running SQL: {e}")
with st.expander("Troubleshooting tips"):
st.markdown("""
- Ensure the **ODBC SQL Server driver** and **SQL Server** are installed and running.
- Confirm the **InsuranceDemo** DB and its **Customers** and **Policies** tables exist.
- If using **SQL Authentication**, edit the connection string in `get_connection()`.
- Check that the generated SQL is valid for SQL Server syntax.
""")
else:
# -----------------------------
# GENERAL Q&A MODE: answer directly with LLM
# -----------------------------
st.markdown("**Mode:** General knowledge (LLM answer)")
# Keep answers short if the checkbox is enabled
style = " Answer briefly in one sentence." if concise else ""
general_prompt = f"Question: {user_input}\nProvide a clear and correct answer.{style}"
response = ask_ollama(general_prompt)
st.subheader("Answer")
st.write(response)
# Show the exact prompt we sent (good for learning)
with st.expander("🔎 Prompt sent to LLM"):
st.code(general_prompt)
# -----------------------------
# END
# -----------------------------
# QUICK RECAP FOR BEGINNERS:
# - The app auto-detects intent using keywords (fast & simple).
# - SQL intent → LLM writes SQL → app runs it on SQL Server → shows results (and chart).
# - General intent → LLM answers directly (no database call).
# - No cloud APIs. Everything is local via Ollama.
Note: I am using VS Code, you can also use notepad++ or Jupytor Notebook or any other idea of your choice.
🔹 Step 7: Run the App
- Open Command Prompt
- Navigate to the folder where app.py is saved:
cd path\to\your\folder
- Run the app:
streamlit run app.py
✅ It will open a browser window at:
http://localhost:8501

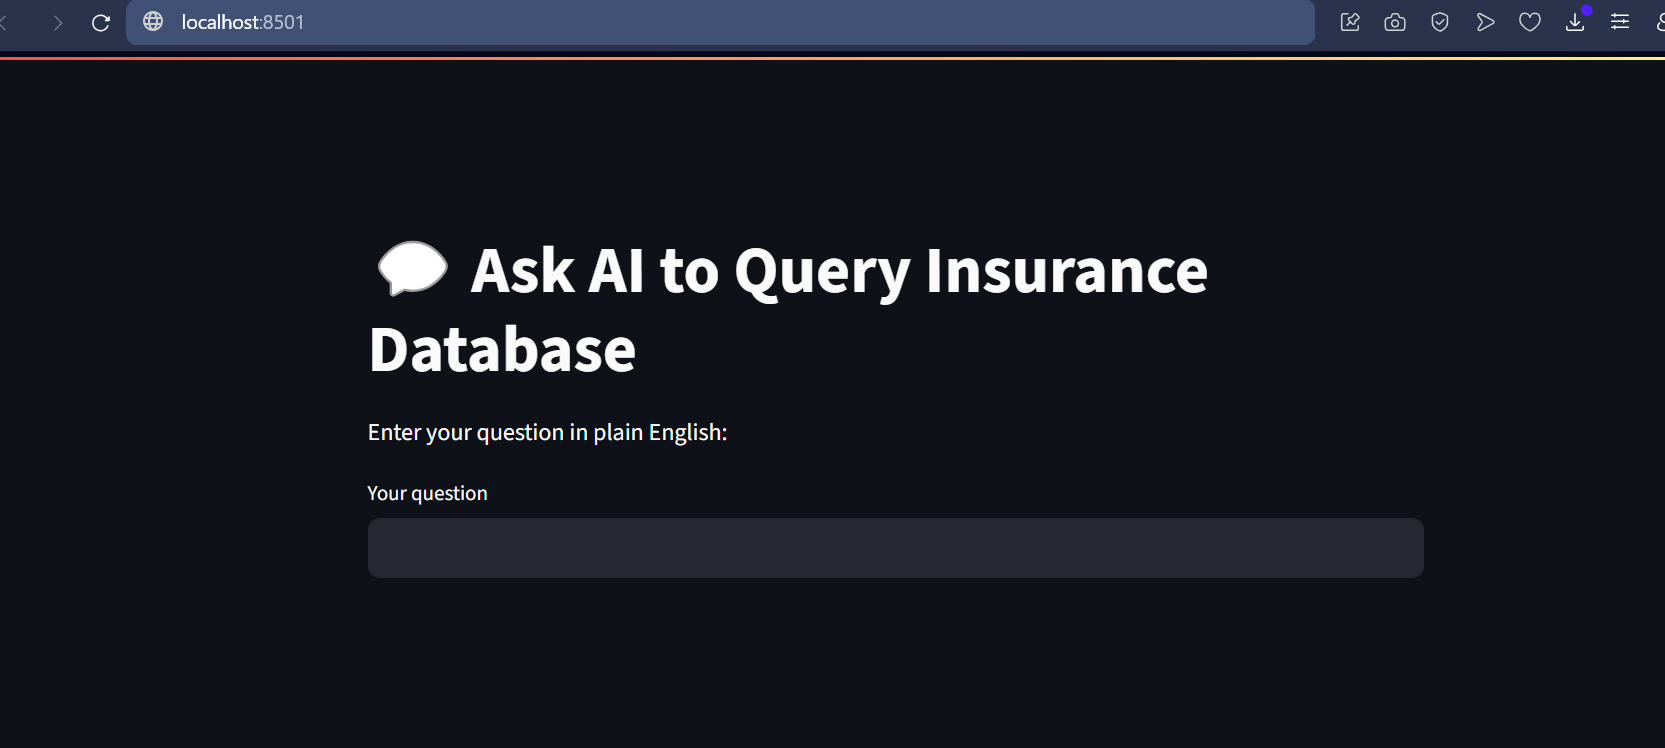
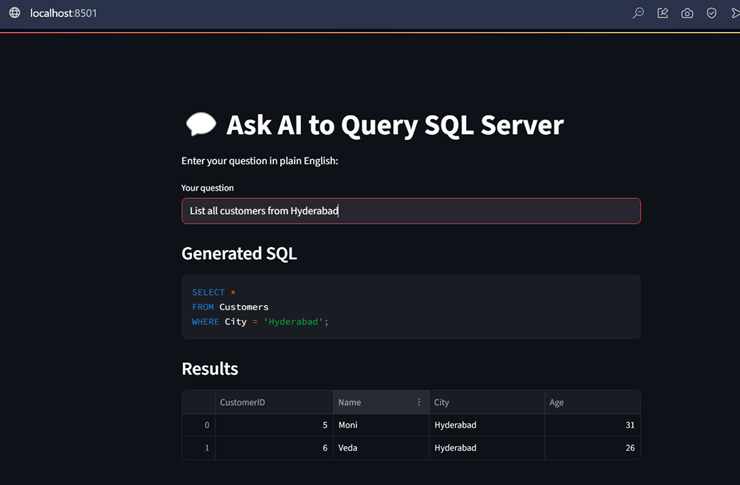
🔹 Step 8: Ask Questions!
Try questions like:
- List all customers from New York
- Show policies purchased after July 2025
- Get total premium by city
The app will:
- Use LLM to generate SQL.
- Run it on SQL Server.
- Show results in a nice table.

Now, I want to beautify my streamlit UI, its just a normal HTML markup language, I added to the app.py
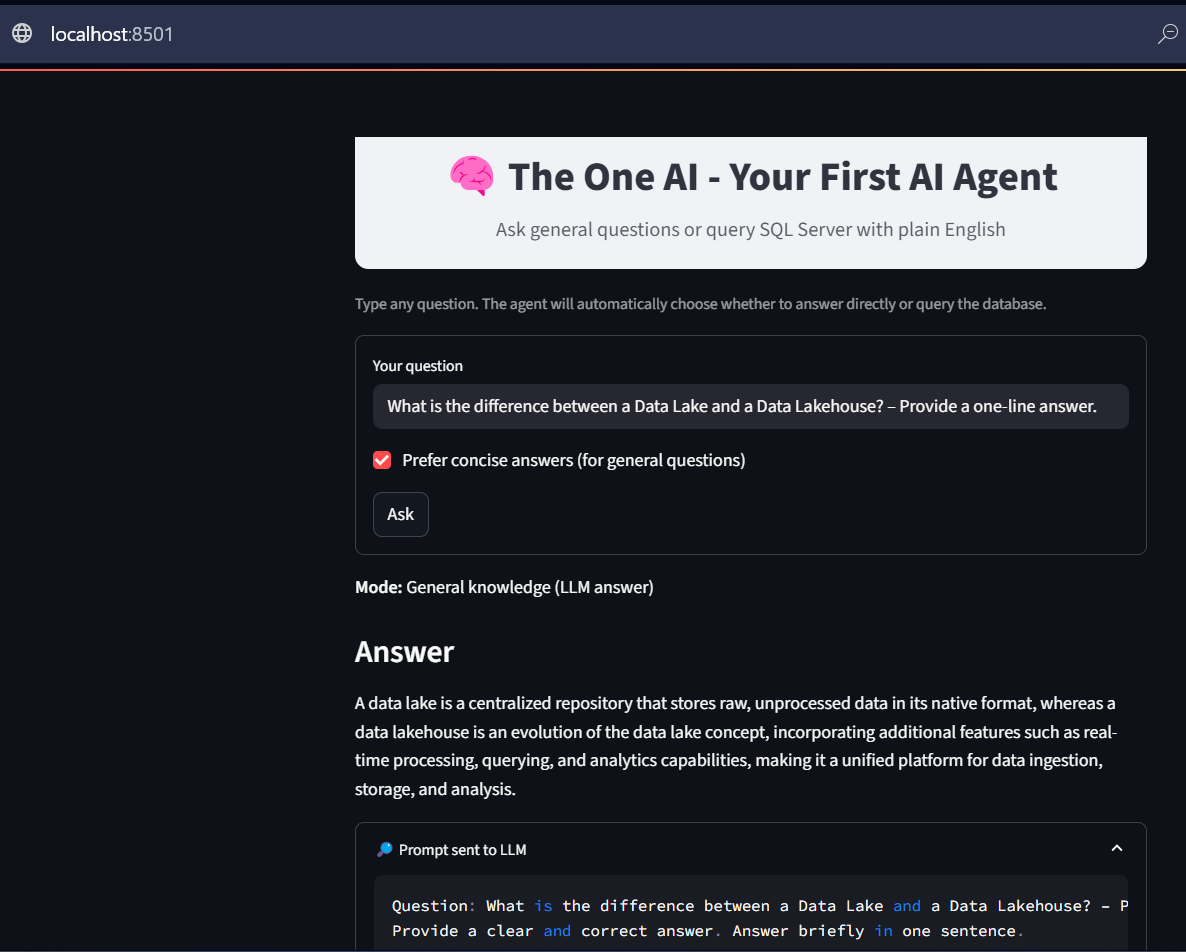
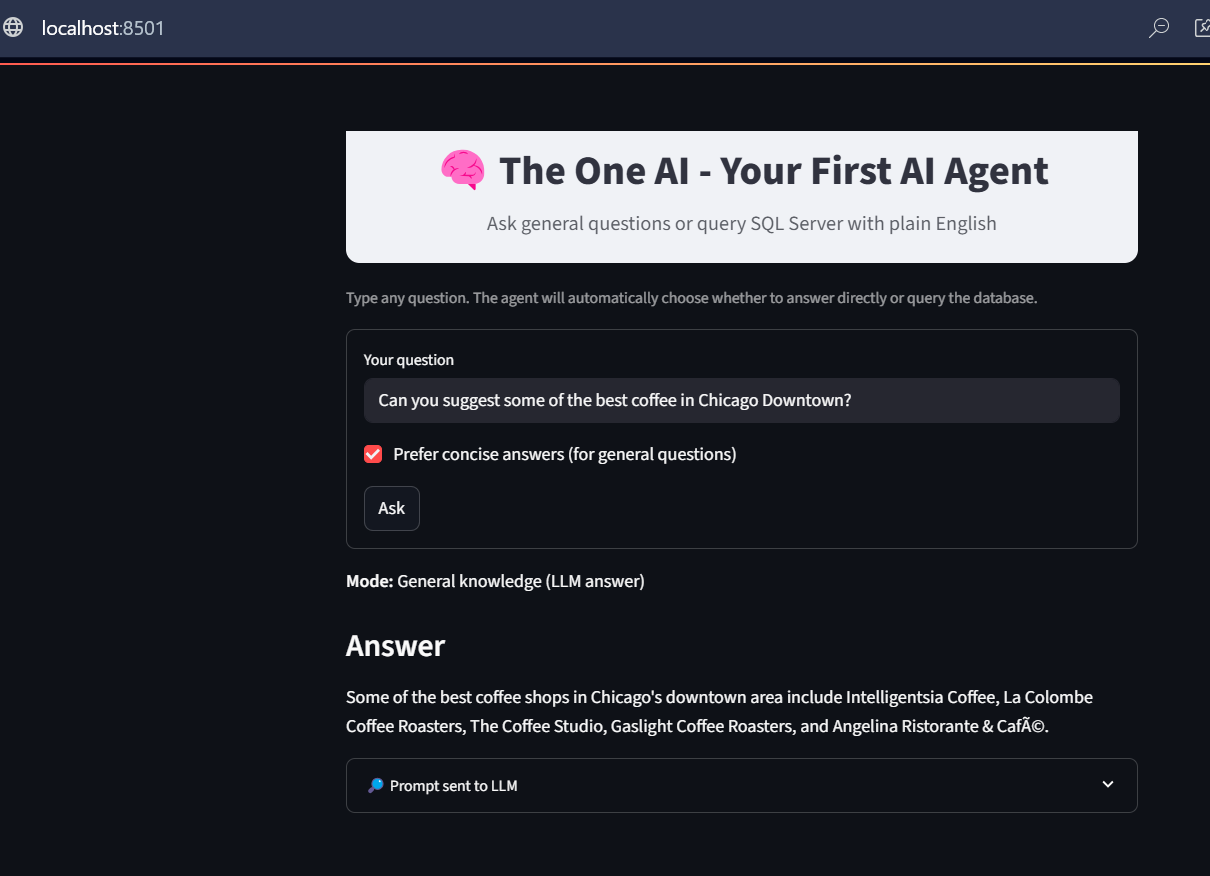
General Knowledge Questions:
This time, let’s try asking a general question and observe how the system responds. Based on the input, our AI Agent correctly identifies it as a general knowledge query. Instead of querying the database, it uses the general knowledge prompt, passes the question directly to the LLM, and then displays the response returned by the LLM.
Sample Questions:
- What is the difference between a Data Lake and a Data Lakehouse? – Provide a one-line answer.
- Can you suggest some of the best cafés in Chicago Downtown?
Note: You may notice a few minor changes in the Streamlit UI, as I was experimenting with some CSS adjustments. Please ignore them. The latest code file is attached with this blog
Code Explanation:
1. PAGE APPEARANCE / HEADER
- This section is about how the Streamlit app looks when you open it.
- You set the page title, favicon icon, and layout (whether it should stretch wide across the screen or stay centered).
- Then you add a big title/header like “The One AI – Your First AI Agent”.
- This heading acts like a banner for your app, giving users a clear idea of what the app does as soon as they open it.
- It’s like setting up the front page of a website — making it neat, professional, and user-friendly.
2. IMPORTS AND INITIAL SETUP
- In this section, you import the Python libraries that your app will use.
- For example:
- streamlit → for creating the web interface.
- pandas → for working with SQL data results in table format.
- pyodbc → for connecting to SQL Server.
- ollama (or OpenAI client) → for sending queries to your local LLM (like Llama3).
- This section is like gathering your tools before starting the actual work. Without these imports, the code can’t run because Python won’t know what functions to use.
3. DATABASE CONNECTION FUNCTION
- This section defines how the app connects to your SQL Server database.
- It usually contains:
- Driver details (SQL Server ODBC driver).
- Server name (your PC or remote SQL server).
- Database name.
- Authentication details (like Windows auth or SQL login).
- The function creates a connection so the app can run queries and fetch results.
- Think of it like plugging a cable between your app and the SQL database — once connected, you can ask the database for any data you want.
4. LLM (AI ENGINE) SETUP
- This section sets up how your app communicates with your local AI model (running in Ollama).
- It defines the model name (like llama3) and the API endpoint.
- The LLM is the “AI brain” in your app — it helps interpret user questions, generate SQL queries, or even provide extra explanations in natural language.
- Example: If a user types “Get me premium collected city-wise”, the AI can generate the right SQL query or provide summaries.
- In short: This is the bridge between the user’s plain-English input and the actual database query.
5. USER INPUT SECTION
- This is the interactive part of the Streamlit app where users type their queries.
- A text box (st.text_input) is used so the user can enter something like:
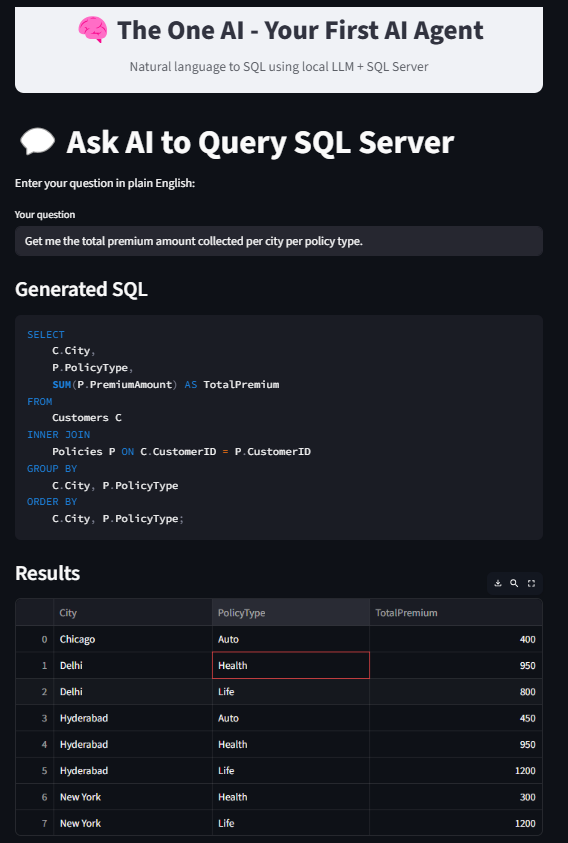
“Get me the total premium amount per city per year.” - When the user presses Enter, the input is captured and passed to the AI engine or directly to the database.
- This is the conversation entry point — it’s where the user tells the AI what they want.
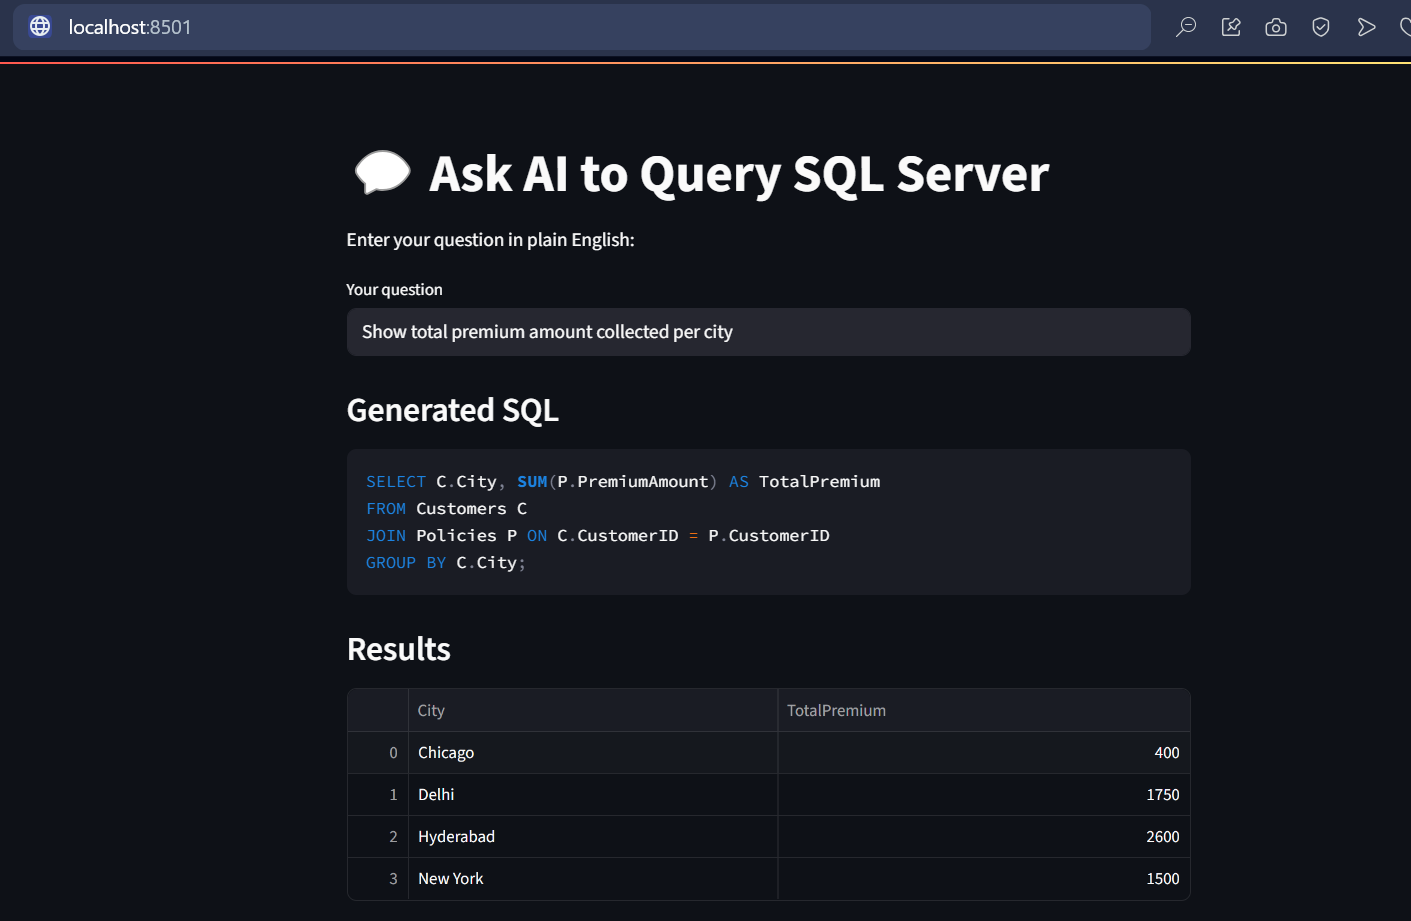
6. GENERATING SQL QUERY WITH AI
- Once the user provides input, the app uses the AI model to turn that input into a valid SQL query.
- Example:
Input → “Get me total premium per city per year”
AI Output → - SELECT City, YEAR(PolicyDate) AS Year, SUM(PremiumAmount) AS TotalPremium
- FROM Premiums
- GROUP BY City, YEAR(PolicyDate);
- This step is important because most users don’t know SQL syntax.
- The AI translates natural language → database query.
7. EXECUTING SQL QUERY
- The app now takes the generated SQL query and sends it to the database.
- It runs the query and fetches the results into a pandas DataFrame.
- If there are any errors (e.g., wrong column names, missing tables), the app shows an error message instead of crashing.
- This part is like the engine room: it actually goes to the database, pulls out the data, and brings it back for display.
8. DISPLAYING RESULTS
- The results from the SQL query are displayed inside the Streamlit app.
- This is done using a table format, so the user can see rows and columns just like in SQL Server Management Studio (SSMS).
- Additionally, you can add visualizations (like bar charts, line charts, pie charts) using Streamlit’s charting features.
- Example: If the result is Premium per City per Year, you can show both the table and a bar chart comparing the cities.
- This makes the data much easier to understand at a glance.
9. EXTRA RESPONSES FROM AI (OPTIONAL)
- Apart from SQL results, the app can also ask the AI model to give additional context or insights.
- Example: If the query result shows Hyderabad collected the most premium, the AI might add:
“Hyderabad is leading in premium collections consistently for the last 3 years.” - This helps users get not just raw data but also meaningful insights.
- This section makes the app feel more like a real AI Agent instead of just a database viewer.
10. END
- The final part usually cleans up connections or just marks the end of the script.
- It ensures everything is wrapped up neatly.
- In Streamlit, you don’t always need explicit cleanup since the app reloads on every change, but it’s good practice to separate logic and keep the code modular.
Summary
| Step | Description |
| 1 | Install Python & pip |
| 2 | Install streamlit, pyodbc, pandas |
| 3 | Install Ollama + pull model |
| 4 | Create demo database in SQL Server |
| 5 | Write app.py using the code above |
| 6 | Run app via streamlit run app.py |
| 7 | Start typing questions and get answers! |
Depending on your PC’s computing power, the response from the LLM may take anywhere from a few seconds to a few minutes. The purpose of this blog is simple—to demonstrate how easily and elegantly we can integrate different components with an LLM to build AI agents. Even with a basic agent code, an open-source LLM, and a regular CPU on a local machine, we can achieve meaningful functionality. The same principles can be scaled up to create powerful, enterprise-grade AI systems using licensed LLMs, high-performance compute, advanced programming and millisecond-response APIs.