SQL Server Database Mirroring With Screenshots
Introduction:
This post takes you through SQL Server Database Mirroring with screenshots in both the ways using T-SQL script and management studio. Also you will learn components involved in SQL Server database mirroring.
Contents
✓ Part1 – Theory
✓ Part2 – Implementing Using T – Sql
✓ Part3 – Implementing Using Ssms
✓ Part4 – Automatic Failover
✓ Part5 – Manual Failover
✓ Part6 – Monitoring Database Mirroring
✓ Part7 – Controlling Database Mirroring
✓ Part8 – Best Practices
✓ Part9 – Migrating to Katmai and Applying Service Packs
✓ Part10 – Database Snap Shots For Reporting
✓ Part11 – Summary
SQL Server Database Mirroring with screenshots
part1 – theory
Introduction:
SQL Server 2005 provides a set of high availability methods that the users can use to achieve fault tolerance and to prevent server outages and data loss. The selection of the high availability method depends on various factors. Some DBAs need the servers to be available 24/7, while others can afford an outage of a couple of hours. Cost also plays a role in the selection. For example, Clustering is an expensive high availability method when compared to Database Mirroring, but it allows the user to failover immediately.
The following high availability features are available with the Enterprise edition:
- Failover Clustering
- Multiple Instances(up to 50)
- Log shipping
- Database Snapshots
- Database Mirroring
The following high availability features are available with Standard Edition:
- Failover Clustering(maximum two nodes)
- Multiple instances(up to 16)
- Log shipping
- Database Mirroring
In this article, we will be discussing about Database Mirroring high availability method.
Since SQL Server 2000, you have been able to create a standby server using replication, log shipping and backup and restore — but now Microsoft has introduced a built-in tool that enables automated failover. Database Mirroring is a new feature in SQL Server 2005 that allows you to mirror database contents from one SQL Server to another SQL Server. It also enables you to failover to the mirrored database in case of a failure.
*****How Database Mirroring Works?
Like log shipping, database mirroring provides protection on a per-database, not a per-instance, level. The easiest way to describe database mirroring is that it is transactional replication meets log shipping with a touch of clustering thrown in for good measure. Like log shipping, you take a pointin-time backup of your database and restore it in a state that can load transaction logs. Database mirroring does not work by sending individual transaction log backups—it sends each individual transaction log record to the standby database (like transactional replication, which is covered in the next chapter). Therefore, anything captured in the transaction log will be applied to the copy of the database on the other server. The action of sending transaction log records can happen synchronously or asynchronously. The switch to the other database can happen either manually or automatically, depending on your configuration. Like log shipping, you can only mirror user databases, not system databases.
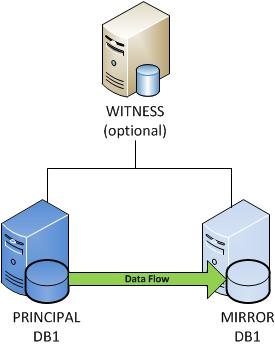
Most of the terminology for database mirroring is different from the other SQL Server availability technologies. You have a source database, or the principal, that then sends the transaction log records to the mirror, which is the target database. The instance with the principal and the instance with the mirror are partners in a database mirroring session. One significant difference from log shipping is that the relationship from the principal database to the mirror database is that it is a 1:1 ratio—you cannot have multiple mirrors for every principal.
Besides the principal and mirror, there is a third optional instance named the witness. The witness is required if you want automatic failover and can be shared by different database mirroring sessions. Like clustering, the witness helps create quorum to ensure that only one of the partners currently owns the database that is used by end users and applications. Database mirroring has three types of quorum:
• Full quorum: A principal, mirror, and witness
• Witness-to-partner quorum: Quorum established by the witness and one of the partners
• Partner-to-partner quorum: Quorum established between the two partners with no witness involved
The quorum mechanisms used by database mirroring are not unlike the heartbeat for failover clustering. It is part of the mechanism that determines failover for a mirrored configuration. Database mirroring performs a ping across the network once every second. If ten pings are returned as missed, a failure is initiated. However, as you will see, different types of failures (SQL Server or hardware/operating system) will affect the time—it will not necessarily be a ten-second failover.
SQL Server failures can generally be quicker than hardware or operating system failures in terms of the ability to switch to the mirror.
Database mirroring requires the use of endpoints that are different from the normal instance endpoints. An endpoint is an object created by SQL Server that is bound to a particular network protocol that allows SQL Server to communicate on your network to applications and other servers. An endpoint for database mirroring is known as a database mirroring endpoint. This endpoint is a shared endpoint for each database on a particular SQL Server instance, so once it is configured, until you change it, all databases that will use database mirroring will use the same endpoint. The database mirroring endpoint is used for SQL Server to SQL Server communication and uses TCP/IP exclusively. The endpoint must have a unique port number that is different from that of any other TCP/IP service on the server. This functions not unlike the cluster private network in a failover clustering configuration.
Database mirroring = replication + Logshipping
Database mirroring is a process that moves database transactions from one SQL Server database to another SQL Server database on a different instance of SQL Server. This mirrored copy is a standby copy and can not be accessed directly; it is used only for a failover situation.
Being new to SQL Server 2005, this feature only works with this version of the software. In a way, it is a mixture of replication and log shipping: All of your transactions are moved (log shipping) on a transaction level (replication) to a mirrored copy of your database, minus some of the issues you would have to face when implementing log shipping or replication.
Replication involves a lot of moving parts, and it is difficult to keep replication running smoothly if your database schema often changes. With log shipping, many processes need to be implemented, such as backup creation, backup copying and backup restore, in order to keep things in sync. If one process breaks, the entire process breaks.
Benefits of Database Mirroring:
1. Implementing database mirroring is relatively easy. It does not require any additional hardware in terms of clustering support. So it proves to be a cheaper implementation instead of clustering a database.
2. Database mirroring provides complete or nearly complete redundancy of the data, depending on the operating modes.
3. It increases the availability of the database.
Best Uses for Database Mirroring
There are a few scenarios that best fit the use of database mirroring. Not all may be applicable in your environment.
Disaster Recovery and High Availability:
Database mirroring supports disaster recovery since it is not bound by distance or a specialized configuration, and supports high availability when you are in the same data center. If your SLA requires you to have as little data loss as possible for your databases, database mirroring is a good choice since, like log shipping, it is a complete copy of your database. If your SLA is a bit more relaxed and you can tolerate some delta between the principal and the mirror, or you are setting up a server remotely, you can use database mirroring in lieu of log shipping.
Migration to New Hardware:
Database mirroring can facilitate moving from one server to another when both are using the same edition of SQL Server 2005. If you configure server A as the principal, and server B as the mirror, at some designated point you can stop all traffic to server A and then manually fail over to the mirror.
Reporting:
The ability to use the mirror as a reporting database is one of the best benefits of deploying database mirroring. This allows even database mirroring deployed as a warm standby to be used in other ways. To configure the mirror as a reporting database, you must create a database snapshot on the mirror database.
Understanding Database Mirroring Concepts
The minimum requirements for Database Mirroring to work include two different instances of SQL Server.
Principal: The principal server is the primary database. This acts as a starting point in a database mirroring session. Every transaction that is applied to the principal database will be transferred to the mirrored database.
Mirror / StandBy: Mirror is the database that will receive the copies from the principal server. There should be consistent connection between the mirrored and the principal server. This is not accessible to the users. In case of the principal server failing, the users can easily switch over.
Witness: In addition to the principal and the mirror, you can introduce another optional component called the “witness.” The witness is a third instance of SQL Server 2005 that acts as an intermediary between the principal and the mirror to determine when to failover. This option is only used when you want to do an automatic failover. It creates the ability to have a 2-to-1 vote that says one of my components is not available and therefore I am going to failover. A witness server is only needed when you want to implement automated failover.
Transaction Safety:
Database mirroring introduces the concept of transaction safety. There are two ways this can be set: FULL (synchronous) and OFF (asynchronous). The value for transaction safety controls which mode will be used by the database mirroring session. The default value is FULL.
Mirroring State
A database participating in database mirroring can have one of the following mirroring states, or status:
• SYNCHRONIZING: This is when the mirror is not caught up to the principal. This would most commonly be seen when database mirroring is first started and is in high performance mode described in the next section.
• SYNCHRONIZED: This is when the mirror is caught up to, or nearly caught up to, the principal. Your transaction safety setting will govern whether there may be data loss. If your transaction safety is set to FULL, there will be no data loss. If it is set to OFF, there is the potential for data loss.
• SUSPENDED: This means that the mirror is unavailable and is not receiving transactions from the principal.
• PENDING_FAILOVER: This state will only occur once a failover from the principal to the mirror is initiated and before the mirror becomes the new primary.
• DISCONNECTED: This is when one partner cannot connect to the other partner.
Modes of implementation
Database Mirroring offers three modes of implementation. The choice you select depends on how you want to handle failover processing.
A)Synchronous Mode:
High Availability: This operating mode option allows you to synchronize transaction writes on both servers and enables automated failover. For this option to work, you must also have a witness server.
High Protection: This option allows you to synchronize transaction writes on both servers, but failover is manual. Since automated failover is not part of this option, a witness server is not used.
B) Asynchronous Mode
High Performance: This option does not care if the writes are synchronized on both servers, therefore offering some performance gains. When using this option, you are just assuming that everything is going to complete successfully on the mirror. This option only allows manual failover, and a witness server is not used.
Note:
Keep in mind that automatic failover to a secondary copy of your data is the real benefit of Database Mirroring. Therefore, most implementation will probably use the High Availability mode. The other options still offer a built-in process for failing over, but chances are you’ll be most interested in having an automated failover in case an issue does arise. The theory
Database mirroring supported versions
Database Mirroring is only available in the Standard, Developer and Enterprise editions of SQL Server 2005. These are the required versions for both the principal and mirror instances of SQL Server. The witness server can run on any version of SQL Server. In addition, there are some other features only available in the Developer and Enterprise editions of SQL Server, but the base functionality exists in the Standard edition.
Microsoft fully supports database mirroring with SQL Server 2005 SP1 onwards. For the RTM release (prior to SP1), Microsoft support services will not support databases or applications that use database mirroring. The database mirroring feature should not be used in production environments. Prior to SP1, database mirroring is disabled by default, but can be enabled for evaluation purposes by using trace flag 1400. The following T-SQL statement can be used to achieve this:
DBCC TRACEON(1400)
part2 – implementation using t – sql
Introduction:
Database mirroring has become a very popular choice for a high availability solution in SQL Server 2005. And while Microsoft recommends using Windows Authentication for anything accessing SQL Server, there are cases where this is a limitation. A typical example would be a non-Microsoft application running on a non-Microsoft platform accessing a SQL Server database. Another would be SQL Servers spread across different geographical locations with no Active Directory to authenticate user access or member servers on different domains with no trust relationships. SQL Server 2005 enables us to configure database mirroring under mixed mode authentication using SQL Server logins with the added security of using certificates.
We will use the ReplGround database to demonstrate the process. Remember to change ReplGround’sdatabase recovery model to FULL before working through the steps below.
Let’s call the principal server udaya, the mirror server balajiraokand witness server vss. You can also do this without the witness although this tip will highlight using one.
Steps :
1) Backup the principal database and restore it on the mirror server
Perform a FULL and LOG backup for the ReplGround database on the principal server.
—————————————————————————————-
—————————————————————————————-
–Run this on Udaya / principal server
USEmaster
GO
BACKUPDATABASE ReplGround
TODISK= N’E:\ReplGround_bkp_04Aug09.bak’
WITHNAME= N’Full Database Backup’,
INIT,STATS= 10
GO
BACKUPLOG ReplGround
TODISK= N’E:\ReplGround_bkp_log_04Aug09.trn’
WITHNAME= N’Transaction Log Backup’,
STATS= 10
GO
—————————————————————————————-
—————————————————————————————-
After the backup has completed, restore it on the mirror server using the WITH NORECOVERY option.
—————————————————————————————-
—————————————————————————————-
–Run this on BalajiRaoK / mirror server
RESTOREDATABASE ReplGround
FROMDISK= N’E:\ReplGround_bkp_04Aug09.bak’
WITHNORECOVERY
GO
RESTORELOG ReplGround
FROMDISK= N’E:\ReplGround_bkp_log_04Aug09.trn’
WITHNORECOVERY
GO
—————————————————————————————-
—————————————————————————————-
2) Validate your DNS entries
Chances are that you may have your DNS entries for the SQL Server instances properly configured. To validate, do a PING test on both hostnames of the servers running your SQL Server 2005 instances using it’s fully qualified domain name (FQDN) in the form hostname.primary DNS suffix. You can retrieve the value of the primary DNS suffix by running an IPCONFIG /ALL in your command line. For servers in workgroups, this could be a bit of a challenge as you might not have a DNS server that would resolve the hostname to their appropriate IP addresses.
You would have to modify your hosts file to manually add the IP address-hostname mappings. To do this, open the hosts file on your %systemroot%\system32\drivers\etc\ using any text editor. Enter the IP addresses and hostnames of your principal, mirror and witness servers as shown below
3) Create a database master key on the principal server
—————————————————————————————-
—————————————————————————————-
–Run this on the principal server/Udaya
USEmaster
CREATEMASTERKEYENCRYPTIONBY
PASSWORD=’citadel’;
GO
—————————————————————————————-
—————————————————————————————-
4) Create the server-based certificate which will be used to encrypt the database mirroring endpoint
—————————————————————————————-
—————————————————————————————-
–Run this on the principal server / Udaya
USEmaster
CREATECERTIFICATE Udaya_cert
WITHSUBJECT=’Udaya certificate for database mirroring’ ,
START_DATE=’01/01/2009′,
EXPIRY_DATE=’12/01/2009′;
GO
—————————————————————————————-
—————————————————————————————-
5) Create the database mirroring endpoint for the principal server using the certificate for authentication
—————————————————————————————-
—————————————————————————————-
–Run this on the principal server / Udaya
USEmaster
CREATEENDPOINT Endpoint_Mirroring STATE=STARTED
ASTCP(LISTENER_PORT= 9999,LISTENER_IP=ALL)
FORDATABASE_MIRRORING
(AUTHENTICATION=CERTIFICATE Udaya_cert,
ENCRYPTION=REQUIRED ALGORITHM AES,ROLE=ALL);
GO
—————————————————————————————-
—————————————————————————————-
This script creates a database mirroring endpoint named Endpoint_Mirroring using port number 9999 and the certificate named udaya_cert. You can use any encryption algorithm available in SQL Server 2005. I just opted to use AES. You can validate that the endpoint has been created by querying the sys.endpoints catalog view
6) Export the certificate to a file
—————————————————————————————-
—————————————————————————————-
–Run this on the principal server / Udaya
USEMASTER
BACKUPCERTIFICATE Udaya_cert TOFILE=’C:\Udaya_cert.cer’;
GO
—————————————————————————————-
—————————————————————————————-
7) Copy the certificate file to the mirror and witness server
You need to copy the certificate file to both the mirror and the witness server as we will use this certificate to associate a login for authentication. For this example, all certificates will be copied to the C:\ drive on all servers
Steps #3 to #7 should be repeated on both mirror and witness server, modifying the certificate name while keeping the other configurations.
A complete script for the mirror server (BalajiRaoK) is shown below
—————————————————————————————-
—————————————————————————————-
–Run this on Mirror / BALAJIRAOK
–STEP #3:
USEmaster
CREATEMASTERKEYENCRYPTIONBYPASSWORD=’citadel’;
GO
–STEP #4:
CREATECERTIFICATE balaji_cert WITHSUBJECT=’balaji certificate for database mirroring’ ,
START_DATE=’01/01/2009′,
EXPIRY_DATE=’12/01/2009′;
GO
–STEP #5:
CREATEENDPOINT Endpoint_Mirroring STATE=STARTED
ASTCP(LISTENER_PORT= 9999,LISTENER_IP=ALL)
FORDATABASE_MIRRORING
(AUTHENTICATION=CERTIFICATE balaji_cert,
ENCRYPTION=REQUIRED ALGORITHM AES,ROLE=ALL);
GO
–STEP #6:
BACKUPCERTIFICATE balaji_cert TOFILE=’C:\balaji_cert.cer’;
GO
–STEP #7: Copy the certificate to the principal and witness servers into the location C:\
—————————————————————————————-
—————————————————————————————-
A complete script for the witness server (vss) is shown below
—————————————————————————————-
—————————————————————————————-
–Run this on Witness / VSS
–STEP #3:
USEmaster
CREATEMASTERKEYENCRYPTIONBYPASSWORD=’citadel’;
GO
–STEP #4:
CREATECERTIFICATE vss_cert WITHSUBJECT=’vss certificate for database mirroring’ ,
START_DATE=’01/01/2009′,
EXPIRY_DATE=’12/01/2009′;
GO
–STEP #5:
CREATEENDPOINT Endpoint_Mirroring STATE=STARTED
ASTCP(LISTENER_PORT= 9999,LISTENER_IP=ALL)
FORDATABASE_MIRRORING
(AUTHENTICATION=CERTIFICATE vss_cert,
ENCRYPTION=REQUIRED ALGORITHM AES,ROLE=ALL);
GO
–STEP #6:
BACKUPCERTIFICATE vss_cert TOFILE=’C:\vss_cert.cer’;
GO
–STEP #7: Copy the certificate to the principal and mirror servers into the location C:\
—————————————————————————————-
—————————————————————————————-
Now we are able to fine three files named as
Uday_cert.cer
Blaji_cert.cer
Vss_cert.cer
In all of C drives of our servers (Principal, Mirror and Witness)
8) Create a login on the principal for the mirror
For simplicity’s sake we shall use the same name for the login on all servers to identify that it is used primarily for the database mirroring sessions
—————————————————————————————-
—————————————————————————————-
–Run this on Udaya
USEmaster;
CREATELOGIN login_mirroring WITHPASSWORD=’citadel’;
GO
—————————————————————————————-
—————————————————————————————-
9) Create a user for the login
—————————————————————————————-
—————————————————————————————-
–Run this on Udaya
USEmaster;
CREATEUSER login_mirroring
FORLOGIN login_mirroring
GO
—————————————————————————————-
—————————————————————————————-
10) Associate the certificate we created in Step #4 with the user
This script will associate the certificate we created for the mirror server – Balaji_cert.cer – to the user login_mirroring
—————————————————————————————-
—————————————————————————————-
–Run this on Udaya
UseMaster
CREATECERTIFICATE Balaji_cert
AUTHORIZATION login_mirroring
FROMFILE=’C:\Balaji_cert.cer’
GO
—————————————————————————————-
—————————————————————————————-
We’ll do the same thing for the certificate we created for the witness server – vss_cert.cer – to the user login_mirroring
—————————————————————————————-
—————————————————————————————-
–Run this on Udaya
UseMaster
CREATECERTIFICATE vss_cert
AUTHORIZATION login_mirroring
FROMFILE=’C:\vss_cert.cer’
GO
—————————————————————————————-
—————————————————————————————-
11) Grant the CONNECT permission on the login
This script will grant the CONNECT permission to the login login_mirroring for the database mirroring endpoint
—————————————————————————————-
—————————————————————————————-
–Run this on Udaya
UseMaster
GRANT CONNECT ONENDPOINT::Endpoint_Mirroring TO [login_mirroring];
GO
—————————————————————————————-
—————————————————————————————-
Note:
Since we used the same name for the logins on all servers, you only need to do this once. If you are using a different name for the logins, you will have to do this for each login. The key thing to remember here is that the logins you use to connect to any of the SQL Server 2005 instances are granted the CONNECT permissions with the appropriate certificates.
We will do the exact same thing on both the mirror and witness servers.
A complete script for the mirror server is shown below
—————————————————————————————-
—————————————————————————————-
–Run this on Balaji
–STEP #8:
USEmaster;
CREATELOGIN login_mirroring WITHPASSWORD=’citadel’;
GO
–STEP #9:
CREATEUSER login_mirroring
FORLOGIN login_mirroring
GO
–STEP #10:
CREATECERTIFICATE Udaya_cert
AUTHORIZATION login_mirroring
FROMFILE=’C:\Udaya_cert.cer’
GO
CREATECERTIFICATE vss_cert
AUTHORIZATION login_mirroring
FROMFILE=’C:\vss_cert.cer’
GO
–STEP #11:
GRANT CONNECT ONENDPOINT::Endpoint_Mirroring TO [login_mirroring];
GO
—————————————————————————————-
—————————————————————————————-
A complete script for the witness server is shown below
—————————————————————————————-
—————————————————————————————-
–Run this on vss
–STEP #8:
USEmaster;
CREATELOGIN login_mirroring WITHPASSWORD=’citadel’;
GO
–STEP #9:
CREATEUSER login_mirroring
FORLOGIN login_mirroring
GO
–STEP #10:
CREATECERTIFICATE Udaya_cert
AUTHORIZATION login_mirroring
FROMFILE=’C:\Udaya_cert.cer’
GO
CREATECERTIFICATE Balaji_cert
AUTHORIZATION login_mirroring
FROMFILE=’C:\Balaji_cert.cer’
GO
–STEP #11:
GRANT CONNECT ONENDPOINT::Endpoint_Mirroring TO [login_mirroring];
GO
—————————————————————————————-
—————————————————————————————-
12) Prepare the mirror server for the database mirroring session
This script prepares the mirror database for the database mirroring session, specifying Udaya as the partner. It is important to run this first on the mirror server before running the equivalent script on the principal server. The hostname specified here should be resolved using the approach you used in Step #2
—————————————————————————————-
—————————————————————————————-
–Run this on BalajiRaoK
USEmaster
GO
ALTERDATABASE ReplGround SETPARTNER=’TCP://Udaya:9999′;
GO
—————————————————————————————-
—————————————————————————————-
13) Prepare the principal server for the database mirroring session
Now that the mirror database has been prepared for the database mirroring session, we will do the same for the principal database specifying testServer2 as the partner.
—————————————————————————————-
—————————————————————————————-
–Run this on Udaya
USEmaster
GO
ALTERDATABASE ReplGround SETPARTNER=’TCP://Balajiraok:9999′;
GO
—————————————————————————————-
—————————————————————————————-
14) Set the safety mode of the mirroring session. It can be FULL for the high safety mode, or OFF for high performance mode:
—————————————————————————————-
—————————————————————————————-
–Run on Princepal
USEMASTER
ALTERDATABASE ReplGround SETPARTNERSAFETY=FULL
GO
—————————————————————————————-
—————————————————————————————-
If you set the safety to FULL, you must configure a witness. On both the principal and mirror,
We will also specify vss as the witness.
—————————————————————————————-
—————————————————————————————-
–Run this on Udaya
USEmaster
GO
ALTERDATABASE ReplGround SETWITNESS=’TCP://vss:9999′;
GO
—————————————————————————————-
—————————————————————————————-
15) Validate the database mirroring configuration using Database Mirroring Monitor
For this first we have to register the mirror database and it is automatically get the partner details.
We will see this in GUI implementation
Mirror one more database in principal (udaya):
We do not need to do any more things, we have to repeat the steps 12,13 and 14 by changing the database name to be mirrored and register the database in mirror monitor.
Database mirroring in mssql server 2005
part3 – implementation using ssms
Configuring Database Mirroring:
Before you can configure database mirroring, you must back up the database (full and one log backup) on the principal, copy the backup to the mirror, and restore the database WITH NORECOVERY. Use your preferred method.
1. Start SQL Server Management Studio and connect to the SQL Server instance that contains the principal database.
2. Expand Databases and select the database that will serve as the principal. Right-click, select Tasks, and then Mirror, as shown in Figure 11-3. Conversely, you can right-click, select Properties, and then select the Mirror page.


3. Click Configure Security. You will see the Configure Database Mirroring Security Wizard dialog as shown in Figure Click Next.

4. On the Include Witness Server dialog as shown in Figure 11-6, select Yes or No. If you are configuring synchronous mirroring (high safety mode), you must use a witness. If you are configuring asynchronous mirroring (high performance mode), you should not configure a witness. Click Next.

5. On the Choose Servers to configure dialog, make sure the option Witness Server Instance is selected as shown in Figure and click Next.

6. On the Principal Server Instance dialog, enter the listener TCP/IP port that will be used by the principal. The default is 5022 and must be unique to this instance of SQL Server 2005. It may be different and will change especially if 5022 is already in use. I suggest you use another port number to avoid potential security threats to known ports. Enter the name of the database mirroring endpoint for the principal. It must be a unique database mirroring endpoint name for the SQL Server instance. The default is Mirroring, but I suggest changing it to something that is easier to remember, such as PrincipalEP. If you want to encrypt the data that is sent across the network, select the Encrypt Data Sent Through This Endpoint option. An example is shown in Figure 11-9. Click Next to continue.
In our case we have already created a certificate, end point, userlogin and assigned access (using t-sql so our default port number is 9999

7. On the Mirror Server Instance dialog, first select the instance in the Mirror Server Instance drop-down as shown in Figure. Click Connect, and you will be prompted to connect to the mirror instance as shown in figure below

Enter the listener TCP/IP port that will be used by the principal. The default is 5022 and must be unique to this instance of SQL Server 2005. I suggest you use another port number to avoid potential security threats to known ports. Enter the name of the database mirroring endpoint for the principal. It must be a unique database mirroring endpoint name for the SQL Server instance. The default is Mirroring, but I suggest changing it to something that is easier to remember, such as MirrorEP. If you want to encrypt the data that is sent across the network, select the Encrypt Data Sent Through This Endpoint option. An example is shown

8. If you are creating a witness, you will see the Witness Server Instance dialog as shown in Figure Select the instance in the Witness Server Instance drop-down. Click Connect, and you will be prompted to connect to the instance that will assume the witness role as
shown in Figure
Enter the listener TCP/IP port that will be used by the principal. The default is 5022 and must be unique to this instance of SQL Server 2005. I suggest you use another port number to avoid potential security threats to known ports. Enter the name of the database mirroring endpoint for the principal. It must be a unique database mirroring endpoint name for the SQL Server instance. The default is the name of Mirroring, but I suggest changing it to something that is easier to remember, such as WitnessEP. If you want to encrypt the data that is sent across the network, select the Encrypt Data Sent Through This Endpoint option. An example is shown in Figure 11-17. Click Next to continue.

9. On the Service Accounts dialog, enter the names of the service accounts used by SQL Server for each instance (principal, mirror, and witness) as shown in Figure below

10. On the Complete the Wizard dialog, shown in Figure 11-20, confirm that the settings are correct, and click Finish. Database mirroring will now be configured for the database. As the install proceeds, status will be displayed. If everything is successful, you will see the dialog in Figure. Click Close.


11. You will then be prompted to either start or not start mirroring as shown in Figure below. Click the appropriate option.

If you choose not to start mirroring, you will see a dialog similar to the one in Figure below. Click OK.

Yahoo ………… We have successfully configured the mirroring.
Database mirroring in mssql server 2005
part4 – automatic Failover
Introduction:
Automatic failover is supported only in database mirroring sessions running with a witness in high-safety mode (high-safety mode with automatic failover). In high-safety mode with automatic failover, once the database is synchronized, if the principal database becomes unavailable, an automatic failover occurs. An automatic failover causes the mirror server to take over the role of principal server and bring its copy of the database online as the principal database. Requiring that the database be synchronized prevents data loss during failover, because every transaction committed on the principal database is also committed on the mirror database.
For automatic failover to improve reliability, the mirror and principal databases must reside on different computers.
Conditions Required for an Automatic Failover
-
The database mirroring session must be running in high-safety mode and must possess a witness.
-
The mirror database must already be synchronized. This guarantees that all of the log sent to the mirror server has been written to disk.
-
The principal server has lost communication with the rest of the database mirroring configuration, while the mirror and witness retain quorum. If all server instances lose communication, however, and the witness and the mirror server later regain communication, automatic failover does not occur.
-
The mirror server has detected the loss of the principal server.
How the mirror server detects a failure of the principal server depends on whether it is a hard or soft failure.
How automatic failover works?
-
If the principal server is still running, it changes the state of the principal database to DISCONNECTED and disconnects all clients from the principal database.
-
The witness and mirror servers register that the principal server is unavailable.
-
If any log is waiting in the redo queue, the mirror server finishes rolling forward the mirror database.
-
The former mirror database moves online as the new principal database, and recovery cleans up all uncommitted transactions by rolling them back as quickly as possible. Locks isolate those transactions.
-
When the former principal server rejoins the session, it recognizes that its failover partner now owns the principal role. The former principal server takes on the role of mirror, making its database the mirror database. The new mirror server synchronizes the new mirror database with the principal database as quickly as possible. As soon as the new mirror server has resynchronized the databases, failover is again possible, but in the reverse direction.
The following illustration shows a single instance of automatic failover.

Possible failures during database mirroring:
The speed of error detection and, therefore, the reaction time of the mirroring session to a failure, depends on whether the error is hard or soft. Some hard errors, such as network failures are reported immediately. However, in some cases, component-specific time-out periods can delay the reporting of some hard errors. For soft errors, the length of the mirroring time-out period determines the speed of error detection. By default, this period is 10 seconds. This is the minimum recommended value.
Failures Due to Hard Errors
Possible causes of hard errors include (but are not limited to) the following conditions:
- A broken connection or wire
- A bad network card
- A router change
- Changes in the firewall
- Endpoint reconfiguration
- Loss of the drive where the transaction log resides
- Operating system or process failure
Failures Due to Soft Errors
Conditions that might cause mirroring time-outs include (but are not limited to) the following:
-
Network errors such as TCP link time-outs, dropped or corrupted packets, or packets that are in an incorrect order.
-
A hanging operating system, server, or database state.
-
A Windows server timing out.
-
Insufficient computing resources, such as a CPU or disk overload, the transaction log filling up, or the system is running out of memory or threads. In these cases, you must increase the time-out period, reduce the workload, or change the hardware to handle the workload.
Adjusting the automatic failover time:
The PARTNER TIMEOUT is the value that SQL Server uses to determine the maximum period of time an instance waits to get a “ping” message from another instance of SQL Server before determining whether a failover should occur.
With the High Availability mode of Database Mirroring there are three servers that are involved as shown below:

The three servers constantly ping each other, forming a quorum, and if one of the machines is not available the other machines determine how to handle the failover. Depending on where the machines are located and the reliability of your network it is possible that the Principal server may be disconnected and the Witness server and the Mirror server still have quorum and therefore initiate the failover.
If there are potential issues with network load or some other reason that may be causing a delay in communicating with all three servers one solution is to change the PARTNER TIMEOUT. By default this value is set to 10 seconds, so if a “ping” is not received in this 10 second period a failover may occur.
To make this change to a longer value, such as 20 seconds, the following command would be issued on the Principal server for the database that is mirrored.
| ALTER DATABASE dbName SET PARTNER TIMEOUT 20 |
Be careful on the value that use for this option. If this value is set to high and a failure really does occur, the automatic failover will take longer based on the value you set.
Database mirroring in mssql server 2005
part5 – Manual Failover
Failing Over from the Principal to the Mirror:
You configure mirroring in the hopes you will never need to use it, but invariably, there will be cases where you will need to bring the mirror online as the new primary. There are two main scenarios for this: a planned failover, and an unplanned failover. The overall sequence is basically the same:
1. Fail the principal over to the mirror.
2. Synchronize logins
3. Ensure all objects that reside outside of the database are re-created on the mirror.
4. Synchronize full-text indexes.
5. Redirect clients to the new primary instance of SQL Server (the former mirror). If you have automatic failover configured in high safety mode, all you need to worry about are steps 2 through 5.
Planned Failover
A planned failover where nothing is wrong with the database mirroring session is the easiest condition to account for.
SQL Server Management Studio
Execute the following command from either the principal or the mirror:
1. Start SQL Server Management Studio.
2. Expand the Databases menu, and select the database that will serve as the principal. Rightclick, select Tasks, and then Mirror. Conversely, you can right-click, select Properties, and then select the Mirror page.
3. Click Failover. You will be prompted as shown in Figure 11-58 to confirm that failing over is the action you wish to perform. Click Yes.

SQL Server Database Mirroring
To verify, refresh SQL Server Management Studio. The roles should be reversed.
Transact-SQL
1. Connect to the instance that contains the principal database with your preferred query tool (sqlcmd or SQL Server Management Studio).
2. Execute the following command to bring the mirror online as the primary. The only response you will get is that the command completed successfully:
USEMASTER
ALTERDATABASE<database_name>SETPARTNERFAILOVER
Unplanned Failover:
If the principal instance becomes unavailable in a high performance mode configuration, or if the principal instances become unavailable in a high security mode configuration, you must manually bring the instance containing the mirror database online. This is a disaster recovery operation, so there is always the chance that you may lose data that may exist on the principal. If you are using a witness, to force the mirror online, the mirror must be able to connect to the witness. If not, you must use the steps in the next section.
To bring the mirror online in this scenario, follow these steps:
1. Connect to the instance that contains the mirror database with your preferred query tool (sqlcmd or SQL Server Management Studio).
2. Run the following command to bring the mirror online as the primary:
——————————————————————————————–
——————————————————————————————–
USEMASTER
GO
ALTERDATABASE<database_name>
SETPARTNERFORCE_SERVICE_ALLOW_DATA_LOSS
GO
——————————————————————————————–
——————————————————————————————–
Unplanned Failover with No Principal or Witness
If you are using high security mode and you lose both the principal and the witness, you will need to recover the database outside of the context of the database mirroring session:
1. Connect to the instance that contains the mirror database with your preferred query tool (sqlcmd or SQL Server Management Studio).
2. Run the following command to remove the database mirroring configuration:
——————————————————————————————–
——————————————————————————————–
USEMASTER
GO
ALTERDATABASE<database_name>SETPARTNEROFF
GO
——————————————————————————————–
——————————————————————————————–
3. Run the following command to bring the mirror online as the primary:
——————————————————————————————–
——————————————————————————————–
USEMASTER
GO
RESTOREDATABASE<database_name>WITHRECOVERY
GO
——————————————————————————————–
——————————————————————————————–
Full-Text Indexes
One thing you will have to worry about after making the mirror the new primary database is your full-text indexes, if you are using that feature of SQL Server. When you restore the database on the mirror, the full-text catalog is at the same point as the restore. Any index changes that occur on the principal that are not logged operations will not be recorded in the transaction log, and therefore not applied as part of the mirroring process. CREATE FULLTEXT CATALOG, ALTER FULLTEXT CATALOG, and DROP FULLTEXT CATALOG are logged operations that will get rolled forward on the mirror. After the switch, you will need to synchronize your database to its corresponding full-text catalog.
Database Mirroring Automating Failover for Multiple SQL Server Databases When There is no Witness
For database mirroring you have the choice of using trace events or you can setup a SQL Server Alert to check for a WMI (Windows Management Instrumentation) event for Database Mirroring state changes. Before we get started there are a few things you need to do:
Preliminary Steps
The mirrored databases and the msdb database must have service broker enabled. This can be checked with this query
————————————————————————————
————————————————————————————
SELECTname, is_broker_enabled
FROMsys.databases
————————————————————————————
————————————————————————————
If the service broker value is not set to 1 you can turn this on by issuing this command for each database.
————————————————————————————
————————————————————————————
ALTERDATABASE msdb SETENABLE_BROKER
————————————————————————————
————————————————————————————
If SQL Server Agent is running this command will not complete, so you will need to stop SQL Server Agent, run the above command and then start SQL Server Agent again. Lastly, if SQL Server Agent is not running you will need to start it.
Creating the Alert:
To setup the alert we are going to do this just like any other alert, but we are going to be using the “WMI event alert” type.
To create the alert, expand the SQL Server Agent tree and right click Alerts and select “New Alert”.

On the New Alert screen we are going to change the type to “WMI event alert”. Another thing that you will notice is the Namespace that is being queried. By default SQL Server will select the correct namespace based on the instance of SQL Server you are working with.

For the query we are using the following:
————————————————————————————
————————————————————————————
SELECT*FROM DATABASE_MIRRORING_STATE_CHANGE
WHEREState= 7 ORState= 8
————————————————————————————
————————————————————————————
Note: The above statement gives error if we run this directly from ssms because it is not an actual table it is a WMI event
This data is read from WMI and whenever the database mirroring state changes to either 7 (manual failover) or 8 (automatic failover) the job or notification will be fired.
In addition, you can further define the query for a particular database such as:
————————————————————————————
————————————————————————————
SELECT*FROM DATABASE_MIRRORING_STATE_CHANGE
WHEREState= 8 AND DatabaseName =’ReplGround’
————————————————————————————
————————————————————————————
Below is a list of the different state changes that can be monitored.
- 0 = Null Notification
- 1 = Synchronized Principal with Witness
- 2 = Synchronized Principal without Witness
- 3 = Synchronized Mirror with Witness
- 4 = Synchronized Mirror without Witness
- 5 = Connection with Principal Lost
- 6 = Connection with Mirror Lost
- 7 = Manual Failover
- 8 = Automatic Failover
- 9 = Mirroring Suspended
- 10 = No Quorum
- 11 = Synchronizing Mirror
- 12 = Principal Running Exposed
- 13 = Synchronizing Principal
On the Response screen we can setup how to handle this event when it occurs. You can either setup a job that runs when the Alert is fired and/or a notification to an operator that has been setup.

Lastly, you can setup additional options for the alert as shown below.

Example Setup
So let’s say you have three databases (Customer, Orders, Log) that are part of an application and if one of the databases automatically fails over you want the other two databases to failover as well. In addition, this mirroring setup includes a Witness server so if a failure occurs the failover is automatic.
Here is how this could be setup.
First we setup the Alert to look at just these three databases.

Then we tell the alert which job to run.

Then we need to create the job “Failover Databases” which will be run when this alert is fired.
For the SQL Agent job “Failover Databases” the jobs steps would look something like the following:
————————————————————————————
————————————————————————————
IFEXISTS(SELECT 1 FROMsys.database_mirroring
WHEREdb_name(database_id)= N’Customer’
AND mirroring_role_desc =’PRINCIPAL’)
ALTERDATABASE Customer SETPARTNERFAILOVER
GO
IFEXISTS(SELECT 1 FROMsys.database_mirroring
WHEREdb_name(database_id)= N’Orders’
AND mirroring_role_desc =’PRINCIPAL’)
ALTERDATABASE Orders SETPARTNERFAILOVER
GO
IFEXISTS(SELECT 1 FROMsys.database_mirroring
WHEREdb_name(database_id)= N’Log’
AND mirroring_role_desc =’PRINCIPAL’)
ALTERDATABASELogSETPARTNERFAILOVER
GO
————————————————————————————
————————————————————————————
The ALTER DATABASE command above forces the failover to the mirrored server for the other databases that did not automatically get flipped. This is the same as if you clicked on the “Failover” button in the GUI.
Script for Failover of all databases:
One case would be when you have a database mirroring pair in a high-protection operating mode without a witness requiring you to do a manual failover, whether planned or unplanned. You can use this script in the Failover Databases job as described in this
tip or simply run it on the mirror database in case you decide to do a manual failover instead of an automated one.
This script uses the FORCE_SERVICE_ALLOW_DATA_LOSS option as in a real disaster; the primary database will be inaccessible. The process will recover the mirror database by finishing all completed transactions and rolling back unfinished ones. Since the old primary is inaccessible, some data may be lost because the synchronous data transfer may not have completed between the time the primary database went down and the transactions got committed on the mirror database.
——————————————————————————————————————————————————————————————————
–This script does a failover of all the databases in a database mirroring session
–to the Mirror server. This will be used in cases where the PRINCIPAL server is no longer available
–and the mirrored databases have to be brought online.
–NOTE: Run this script in the MIRRORED server instance
SETNOCOUNTOFF
DECLARE @strSQL NVARCHAR(200)
–variable for dynamic SQL statement – variable size should change depending on the
DECLARE @strDatabasename NVARCHAR(50)
–variable for destination directory used for cursor allocation
DECLARE MyCursor CURSORFOR
SELECTnameFROM master.sys.databases a
INNERJOIN master.sys.database_mirroring b
ON a.database_id=b.database_id
WHERENOT mirroring_guid ISNULL
AND mirroring_role_desc=’MIRROR’
OPEN MyCursor
FETCHNextFROM MyCursor INTO @strDatabasename
WHILE@@Fetch_Status= 0
BEGIN
—Run the ALTER DATABASE databaseName SET PARTNER FORCE_SERVICE_ALLOW_DATA_LOSS
SET @strSQL =’ALTER DATABASE ‘+ @strDatabaseName +
‘ SET PARTNER FORCE_SERVICE_ALLOW_DATA_LOSS’
EXECsp_executesql @strSQL
PRINT’Bringing ‘+ @strDatabaseName +’ ONLINE’
PRINT’========================================’
FETCHNextFROM MyCursor INTO @strDatabasename
END
CLOSE MyCursor
DEALLOCATE MyCursor
—————————————————————————————————
—————————————————————————————————
Database mirroring in mssql server 2005
part6 – monitoring database mirroring
✓Database Mirroring Monitor
✓Performance Monitor
✓SQL Server Profiler
✓Transact SQL
Database Mirroring Monitor
The Database Mirroring Monitor is launched from SQL Server Management Studio, as shown in Figure

To register database mirroring sessions, take the following steps:
1. Click Register Mirrored Database, as shown in below Figure

2. On the Register Mirrored Database dialog, if it is available, select either the principal or mirror from the drop-down, or click Connect as
And provide the authentication information
3. After connecting to the principal or the mirror, you will see a display similar to the one shown in Figure 11-34. Select the Register check box next to the database, as shown in Figure, and click OK.

4. On the Manage Server Instance Connections dialog, the configuration should automatically select the other instances participating in the database mirroring session as shown in Figure. If not, click Add and connect to the instance. Click OK when done.

5. When finished, expand the Database Mirroring Monitor and the database mirroring session will be displayed as shown in below Figure
Select the database mirroring session in the Database Mirroring Monitor. You will see a dialog similar to the one shown in 2 Figure . You will see quite a few statistics and bits of information about that database mirroring session. The two most important things besides the actual state and connection status are Unsent Log and Unrestored Log. These will indicate delays (for whatever reason). What you can do is set thresholds and if the threshold exceeds a limit you set, you can be notified.

If you want to see the history of what has transpired on the principal or mirror, click the History ellipsis button in the right row. You will see a display similar to the one in below figure

You can also see if there are problems with the database mirroring session. Select the Warnings tab. You will see a display similar to the one in below Figure. The thresholds must be enabled to see if any problems are occurring.

To enable the thresholds, click Set Thresholds. When the Set Warnings Thresholds dialog is displayed as shown in below Figure 2, check the check box for the server (principal or mirror) you want to alter, and then select the numeric value and alter it as necessary. An example is shown in below Figure. Click OK.


The new values will be reflected on the Warnings tab. An example is shown in below Figure

Performance Monitor (PerfMon)
It is a tool through which we can monitor the performance of our system resources. To open the PerfMon
→ Control Panel → Administrative Tools → Performance
There are some counters in Performance Monitor that can be indicators for database mirroring. The bulk of the counters can be found in the new counter object SQL Server:Database Mirroring. Each counter is set per database.
The following is a list of the counters you should monitor on the principal:
• Bytes Sent/sec: This is the total number of bytes sent per second.
• Log Bytes Sent/sec: This is the total number of transaction log bytes sent per second.
• Log Send Queue KB: This is the current queue for mirroring and is measured against your transaction log. If there is a number above 0, it is the amount that has not been transmitted to the mirror. This may or may not represent a problem; so when monitoring, know your thresholds.
• Pages Sent/sec: This is the number of pages sent to the mirror per second.
• Send/Receive Ack Time: This monitors the mirroring process from a network perspective.
• Sends/sec: This is the total number of sends the mirroring process starts every second.
• Transaction Delay: This is the delay measured in milliseconds that SQL Server has to wait to hear back from the mirror that a commit has occurred for a transaction. This is a summed counter, meaning it represents all transactions currently in process.
The following is a list of the counters you should monitor on the mirror:
• Bytes Received/sec: This is the total number of bytes that the mirror is receiving from the primary every second.
• Log Bytes Received/sec: This is the amount of transaction log bytes that are received every second.
• Receives/sec: This is the total number of actual receives per second.
• Redo Bytes/sec: This tells you the rate (in bytes) at which transactions in the transaction log has actually been applied to the database.
• Redo Queue KB: This should generally be a low number since it indicates that there is a queue of transactions waiting to be rolled forward. This number is represented in total size, not in terms of number of transactions. If you are doing a data intensive task such as an index rebuild or logged bulk insert, you may see a higher redo queue. You may also see a redo queue if you have a slow (i.e., high latency) network.
Here are some other useful counters that can aid you with database mirroring:
• Logical Disk Disk Write Bytes/sec: This tells you how fast your disk is being written to. If this value is not fast enough, it will impact your database mirroring performance. Slow disks are not what you want. You should monitor the log and data disks for both the principal and
the mirror.
• SQL Server: Databases Log Bytes Flushed/sec: This tells you how fast SQL Server is flushing the log and writing the contents of the transaction log to disk. If this number is high, it means you may have a suboptimal disk subsystem that will impact the performance of
your principal.
• SQL Server: Databases Transactions/sec: This tells you how many transactions are occurring per second in the selected database.
Below Figure shows the addition of one of the database mirroring counters for a single database.

Here are some helpful calculations using Performance Monitor information:
•Average delay per transaction = (Transaction Delay)/(Transactions/sec)
• Estimated time for the mirror to catch up with the principal = (Log Send Queue KB)/
(Log Bytes Received/sec)
• Estimated time to roll transaction forward = (Redo Queue KB)/(Redo Bytes/sec)
Sql server Profiler:
Within Profiler, you can not only trace any Transact-SQL statement issued that may relate to database mirroring, but you can capture failover events. Using this information, you can determine the time it takes to switch from the principal to the mirror.
1. Start SQL Server Profiler
2. From the File menu, select New Trace
3. Connect to the database instance that has the principal
4. On the Trace Properties dialog, enter a name for your trace in Trace Name
5. Select the Event Selection tab and select the Show All Events check box. Expand the Database menu, and select the option Database Mirroring State Change
6. Click Run. When the failover occurs, you will see events similar to the ones pictured in Figure. The EventClass is Database Mirroring State Change. Depending on whether you do a manual or an automatic failure, the messages will be slightly different.

Transact – SQL:
There are three views and one DMV for use with database mirroring. If you want to know the status of what is going on with mirroring as well as other information without using any kind of interface, these will be your best bet:
• sys.database_mirroring: This view contains the configuration information for the particular instance you are connected to in the query window.
• sys.database_mirroring_endpoints: This view contains information about the endpoints defined for each database. There is only one row per database.
• sys.database_mirroring_witnesses: This view contains information about the witness if one is configured. There is one row per principal.
• sys.dm_db_mirroring_connections: This DMV shows current information about the connections involved with database mirroring. There is one row per connection.
The following three sections show example queries with some of the things you can do with the DMVs. If you are having problems with your database mirroring setup, you should query the DMVs to see if they contain the values you expect. For example, if you are having connection problems, query the sys.database_mirroring_endpoints DMV to see that the endpoints are properly defined and started.
Database Mirroring Status for One Database:
This query will return the role and safety level for one database where database_name is the name of your database:
—————————————————————————————-
—————————————————————————————-
SELECT
sd.[name] AS’Database’,
sdm.mirroring_role_desc AS’Mirroring Role’,
sdm.mirroring_state_desc AS’Mirroring State’
FROM
SYS.DATABASES sd,SYS.DATABASE_MIRRORING sdm
WHERE
sd.database_id = sdm.database_id
AND sd.[name] =’ReplGround’
—————————————————————————————-
—————————————————————————————-
Database Mirroring Status for All Databases:
This query will return the role and mirroring status for each database:
—————————————————————————————-
—————————————————————————————-
SELECT
sd.[name] AS’Database’,
sdm.mirroring_role_desc AS’Mirroring Role’,
sdm.mirroring_state_desc AS’Mirroring State’
FROM
SYS.DATABASES sd,SYS.DATABASE_MIRRORING sdm
WHERE
sd.database_id = sdm.database_id
—————————————————————————————-
—————————————————————————————-
Safety Level:
This query will return the role and safety level for each database:
—————————————————————————————-
—————————————————————————————-
SELECT
sd.[name] AS’Database’,
sdm.mirroring_role_desc AS’Mirroring Role’,
sdm.mirroring_safety_level_desc AS’Safty’
FROM
SYS.DATABASES sd,SYS.DATABASE_MIRRORING sdm
WHERE
sd.database_id = sdm.database_id
—————————————————————————————-
—————————————————————————————-
Database mirroring in mssql server 2005
part7 – Controlling Database Mirroring
✓ Suspending Database Mirroring
✓ Resuming Database Mirroring
✓ Altering Database Mirroring Configuration
✓ Removing Database Mirroring
Suspending Database Mirroring
Suspending the database mirroring session will pause the mirroring from the principal to the mirror. It will cause mirroring to stop sending transactions to the mirror, and the transaction log on the principal will grow until it runs out of space or mirroring is resumed.
SQL Server Management Studio
To suspend database mirroring using SQL Server Management studio, use the following instructions
1. Start SQL Server Management Studio.
2. Expand the Databases menu, and select the database that will serve as the principal. Rightclick, select Tasks, and then Mirror. Conversely, you can right-click, select Properties, and then select the Mirror page.
3. Click Pause. You will be prompted as shown in Figure 11-53. Click Yes. The database mirroring session will now be paused, and its new status will be reflected as shown in Figure

Transact-SQL
To suspend database mirroring via Transact-SQL, use the following instructions
1. Connect to the instance that contains the mirror database with your preferred query tool (sqlcmd or SQL Server Management Studio).
2. Make sure that your context is the master database. Issue the following command:
USE master
GO
3. Run the following command to bring the mirror online as the primary:
ALTER DATABASE <database_name> SET PARTNER SUSPEND
Resuming Database Mirroring:
To resume the database mirroring session from a suspended state, use one of the following methods.
SQL Server Management Studio
To use SQL Server Management Studio to resume your session, use the following instructions:
1. Start SQL Server Management Studio.
2. Expand Databases, and select the database that will serve as the principal. Right-click, select Tasks, and then Mirror. Conversely, you can right-click, select Properties, and then select the Mirror page.
3. Click Restart.
Transact-SQL
To use Transact-SQL to resume your session, use the following instructions:
1. Connect to the instance that contains the mirror database with your preferred query tool (sqlcmd, osql, or SQL Server Management Studio).
2. Make sure that your context is the master database. Issue the following command:
USE master
GO
3. Run the following command to bring the mirror online as the primary:
ALTER DATABASE database_name SET PARTNER RESUME
Altering the Database Mirroring Configuration
After you configure database mirroring, you have the ability to change its configuration later. This is done through the ALTER DATABASE statement of Transact-SQL. You should not perform any of these tasks without scheduling an interruption in service to the end users, since some of these options may affect the availability or performance of database mirroring during the reconfiguration. You have the following options available to you:
• SET PARTNER SAFETY: This sets the mode of database mirroring—high safety or high security. For high safety mode, set a value of FULL. For high performance mode, set a value of OFF. If you set this to OFF, you must also disable the witness as shown here:
—————————————————————————————-
—————————————————————————————-
USEmaster
GO
ALTERDATABASE database_name SETPARTNERSAFETYFULL
GO
—————————————————————————————-
—————————————————————————————-
• SET PARTNER TIMEOUT: This sets the value that controls how long database mirroring will wait until it decides that the principal is unavailable. The value is an integer and is represented in seconds. You cannot set this below five seconds; SQL Server will use five seconds even if you enter a lower value. You should not alter this unless you are seeing a problem, as a lower value may create false failovers if automatic failovers can occur:
—————————————————————————————-
—————————————————————————————-
USEmaster
GO
ALTERDATABASE database_name SETPARTNERTIMEOUT 5
GO
—————————————————————————————-
—————————————————————————————-
• SET WITNESS = ‘witness_name’: This configures the instance that will serve as the witness. This needs to be set if safety is set to FULL:
—————————————————————————————-
—————————————————————————————-
USEmaster
GO
ALTERDATABASE database_name SETWITNESS=’mynewwitness’
GO
—————————————————————————————-
—————————————————————————————-
• SET WITNESS OFF: This unconfigures the witness from the database mirroring session:
—————————————————————————————-
—————————————————————————————-
USEmaster
GO
ALTERDATABASE database_name SETPARTNERWITNESSOFF
GO
—————————————————————————————-
—————————————————————————————-
Removing Database Mirroring:
If you decide to remove the database mirroring session from the partners, you can do it either via SQL Server Management Studio or Transact-SQL.
SQL Server Management Studio
1. Start SQL Server Management Studio.
2. Expand the Databases menu, and select the database that will serve as the principal. Rightclick, select Tasks, and then Mirror. Conversely, you can right-click, select Properties, and then select the Mirror page.
3. Click Remove Mirroring. You will be prompted as shown in Figure below

Click OK to close the Properties dialog. To verify, refresh SQL Server Management Studio. The database that was the principal will just show its name, and the mirror will show that it is in a loading state.
Transact-SQL
1. Connect to the instance that contains the mirror database with your preferred query tool (sqlcmd or SQL Server Management Studio).
3. Execute the following command to remove database mirroring. The only response you will get is that the command completed successfully:
USE MASTER
ALTER DATABASE database_name SET PARTNER OFF
GO
Database mirroring in mssql server 2005
part8 – Best Practices
1. The principal database and the mirror database should be on separate physical hardware, and ideally, in different physical locations.
2. The witness server should be on separate physical hardware, and be on a separate network (best if at a third location).
3. Initial database mirroring setup should be done during less busy times, as the setup process can negatively affect performance of the production database being mirrored.
4. Use high availability mode whenever possible, and high performance mode only when required.
5. The hardware, along with the OS and SQL Server configuration, should be identical (at least very similar) between the two servers.
6. While a fast connection is not required between mirrored servers, the faster the connection, and the better quality the connection, the better.
7. You will want to optimize the performance of the mirrored database as much as possible to reduce the overhead caused by the mirroring process itself.
8. Thoroughly test database mirroring before putting it into production.
9. Monitor database mirroring daily to ensure that it is working properly, and is meeting performance goals.
10. Develop a formal operational and recovery procedure (and document) to support mirroring. Periodically test the failover process to ensure that it works.
Database mirroring in mssql server 2005
part9 – Migrating to KATMAI, Applying Hot Fixes and Service Packs
Migrating Mirrored Databases From Yukon to Katmai:
When upgrading server instances from SQL Server 2005 to SQL Server 2008, you can reduce downtime for each mirrored database to only a single manual failover by performing a sequential upgrade, known as a rolling upgrade. A rolling upgrade is a multi-stage process that in its simplest form involves upgrading the server instance that is currently acting as the mirror server in a mirroring session, then manually failing over the mirrored database, upgrading the former principal server, and resuming mirroring. In practice, the exact process will depend on the operating mode and the number and layout of mirroring session running on the server instances that you are upgrading.
Before starting a rolling upgrade, we recommend that you:
1.Perform a practice manual failover on at least one of your mirroring sessions:
2.Protect your data:
- Perform a full database backup on every principal database:
- Run the DBCC CHECKDB command on every principal database.
Stages of a Rolling Upgrade
The specific steps of a rolling upgrade depend on the operating mode of the mirroring configuration. However, the basic stages are the same.
The following illustration is a flowchart that shows the basic stages of a rolling upgrade for each operating mode. The corresponding procedures are described after the illustration.

1. To change a session from high-performance mode to high-safety mode
If a mirroring session is running in high-performance mode, before you perform a rolling upgrade, change the operating mode to high safety without automatic failover. In SQL Server Management Studio: Change the Operating mode option to High safety without automatic failover (synchronous) by using the Mirroring Page of the Database Properties dialog box. In Transact-SQL: Set transaction safety to FULL.
2. To remove a witness from a session
If a mirroring session involves a witness, we recommend that you remove the witness before you perform a rolling upgrade. Otherwise, when the mirror server instance is being upgraded, database availability depends on the witness that remains connected to the principal server instance. After you remove a witness, you can upgrade it at any time during the rolling upgrade process without risking database downtime.
3. To perform the rolling upgrade
-
To minimize downtime, we recommend the following: Start the rolling upgrade by updating any mirroring partner that is currently the mirror server in all its mirroring sessions. You might have to update multiple server instances at this point.
-
The server instance to upgrade first depends on the current configuration of your mirroring sessions, as follows:
-
If any server instance is already the mirror server in all its mirroring sessions, upgrade the server instance to the new version.
-
If all your server instances are currently the principal server in any mirroring sessions, select one server instance to upgrade first. Then, manually fail over each of its principal databases and upgrade that server instance.
-
After being upgraded, a server instance automatically rejoins each of its mirroring sessions.
-
For each mirroring session whose mirror server instance has just been upgraded, wait for the session to synchronize. Then, connect to the principal server instance, and manually fail over the session. On failover, the upgraded server instance becomes the principal server for that session, and the former principal server becomes the mirror server.
-
The goal of this step is for another server instance to become the mirror server in every mirroring session in which it is a partner.
Restrictions after you failover to an upgraded server instance.
Note:
-
In a complex mirroring configuration, some server instance might still be the original principal server in one or more mirroring sessions. Repeat steps 2–4 for those server instances until all instances involved are upgraded.
-
Resume the mirroring session.
-
Upgrade any remaining server instance that is the witness in all its mirroring sessions. After an upgraded witness rejoins a mirroring session, automatic failover becomes possible again. You might have to update multiple servers at this point.
4. To return a session to high-performance mode
Optionally, return to high-performance mode by using one of the following methods:
-
In SQL Server Management Studio: Change the Operating mode option to High performance (asynchronous) by using the Mirroring Page of the Database Properties dialog box.
-
In Transact-SQL: Use ALTER DATABASE to set transaction safety to OFF.
5. To add a witness back into a mirroring session
Optionally, in high-safety mode, reestablish the witness to each mirroring session.
Database mirroring in mssql server 2005
part10 – Database Snapshots For Reporting On Mirror
You can take advantage of a mirror database that you are maintaining for availability purposes to offload reporting. To use a mirror database for reporting, you can create a database snapshot on the mirror database and direct client connection requests to the most recent snapshot. A database snapshot is a static, read-only, transaction-consistent snapshot of its source database as it existed at the moment of the snapshot’s creation. To create a database snapshot on a mirror database, the database must be in the synchronized mirroring state.
Unlike the mirror database itself, a database snapshot is accessible to clients. As long as the mirror server is communicating with the principal server, you can direct reporting clients to connect to a snapshot. Note that because a database snapshot is static, new data is not available. To make relatively recent data available to your users, you must create a new database snapshot periodically and have applications direct incoming client connections to the newest snapshot.
If role switching occurs, the database and its snapshots are restarted, temporarily disconnecting users. Afterwards, the database snapshots remain on the server instance where they were created, which has become the new principal database. Users can continue to use the snapshots after the failover. However, this places an additional load on the new principal server. If performance is a concern in your environment, we recommend that you create a snapshot on the new mirror database when it becomes available, redirect clients to the new snapshot, and drop all of the database snapshots from the former mirror database.
Example
This example creates snapshots on a mirrored database. Assume that the database of a database mirroring session is ReplGround. This example creates three database snapshots on the mirror copy of the ReplGround database, which resides on the D drive. The snapshots are named ReplGround_0600, ReplGround_1200, and ReplGround_1800 to identify their approximate creation times.
Create the first database snapshot on the mirror of ReplGround. ————————————————————————————————
————————————————————————————————
CREATEDATABASE ReplGround_0600
ON(NAME=’ReplGround_File1′,FILENAME=’D:\ReplGround_0600.SNP’)
ASSNAPSHOTOF ReplGround
————————————————————————————————
————————————————————————————————
————————————————————————————————
————————————————————————————————
CREATEDATABASE ReplGround_1200
ON(NAME=’ReplGround_File1′,FILENAME=’D:\ReplGround_1200.SNP’)
ASSNAPSHOTOF ReplGround
————————————————————————————————
————————————————————————————————
At this point, new client connections can be programmatically directed to the latest snapshot…
Create the third snapshot on the mirror ReplGround. Users who are still using ReplGround_0600 or ReplGround_1200 can continue to use them.
————————————————————————————————
————————————————————————————————
CREATEDATABASE ReplGround_1800
ON(NAME=’ReplGround_File1′,FILENAME=’D:\ReplGround_1800.SNP’)
ASSNAPSHOTOF ReplGround
————————————————————————————————
————————————————————————————————
At this point, new client connections can be programmatically directed to the latest snapshot.
Summary
Database mirroring is an excellent option for high availability or disaster recovery if it meets your needs. It offers granular protection at a per-transaction level, which is a distinct advantage if that is what your SLA requires. Despite the ability to do an automatic failover to the mirror, database mirroring may not meet your needs depending on your configuration. Database mirroring does require a fairly robust hardware design that also goes hand in hand with how you configure database mirroring. Database mirroring may be the new kid on the block, but it compares favorably to other technologies that have been in SQL Server for quite some time, such as replication.
Database Mirroring In Mssql Server 2005


[…] A complete look – SQL Server Database mirroring […]
Thanks for another wonderful post. Where else could anybody get that type of information in such an ideal way of writing? I have a presentation next week, and I’m on the look for such information.
Thanks for wonderful post
thanks, thanks a lot
Thanks Ganesh
Nice post!!!! Great work done.
Thank You so much Manmeet for visiting our blog.
Happy Reading
The SQL Team
http://udayarumilli.com/
SQL Server database mirroring with … – Most of the terminology for database mirroring is different from the other SQL Server availability technologies. You have a source database, or the
SQL Server Database Mirroring With … – Most of the terminology for database mirroring is different from the other SQL Server availability technologies. You have a source database, or the principal, that
SQL Server Database Mirroring With … – Most of the terminology for database mirroring is different from the other SQL Server availability technologies. You have a source database, or the principal, that
[…] SQL Server database mirroring with screenshots […]
nice post
Thanks Ajay.
Happy Reading
The Team SQL
http://www.udayarumilli.com
Very Nice post and detail explanation and excellent
kindly give any scenario based tips make more helpful
this is my blog http://www.sqltechi.blogspot.in
Thanks Ashok.
We covered the possible scenarios in the book “SQL THE ONE”. By the way your blog looks good and it would be great if you can arrange the top posts in order.
Thanks
SQL THE ONE team
http://www.udayarumilli.com